
Remote Shooting
Various functions can be used to record images. The displayed icons vary depending on the digital camera or other settings.

Preparations
- 1Make a Wi-Fi connection to the camera.
- 2Tap Home

 [Remote shooting].
- (iOS devices) When a message to confirm the change of destination is displayed, select [Join].
The recording screen is displayed.
Shooting
Shooting Pictures
- 1Set the camera's drive mode dial to [
 ], [
], [ ] / [
] / [ ], or [
 ].
]. - 2Tap
 .
.
- Recordings are made in succession while is long tapped.
- Recordings are made in succession while
Recording Videos
- 1Set the camera's drive mode dial to [], [] / [], or [].
- 2Tap
 .
.
- Video recording starts. Tap again to stop recording.
- If the recording settings are changed during recording a video, the icons on the recording screen may not be updated.
Time Lapse Shot
Takes pictures of animals, plants or other subjects automatically with a fixed interval.
- 1 (If Priority of Remote Device is
 )
)
① Set the camera's drive mode dial to [
 ].
].② On the camera, set [Mode] to [Time Lapse Shot].
 [][
[][ ][Time Lapse/Animation][Mode][Time Lapse Shot]
- Press the shutter button of the camera halfway to exit the menu.
 )
)
① Tap
 [Drive Mode] and select [Time Lapse/Animation].
-
2Tap [Time Lapse/Animation] and set the recording.
Item Description [Mode] Switches between Time Lapse Shot and Stop Motion Animation. [Shooting Interval Setting] [ON]
Sets the interval before the next recording takes place.
[OFF]
Takes pictures without leaving recording intervals.[Start Time] [Now]
Tapto start recording.
[Start Time Set]
Starts recording at the set time.[Image Count]/
[Shooting Interval]Sets the number of pictures and the recording interval to be taken. - [Shooting Interval] is not displayed when [Shooting Interval Setting] is set to [OFF].
[Exposure Leveling] Adjusts the exposure automatically to prevent large changes in brightness between adjacent frames. - 3Tap to start recording.
A message is displayed for 5 seconds when the recording is stopped.
-
Pause/end the recording
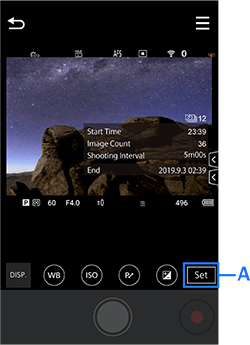
Tap
 (A) during Time Lapse Shot recording to perform the following operations.
Item Description [Pause] Pauses the recording.
<Resumes the recording>
a Tap
.b Select
→ [Resume].*When [Shooting Interval] is set to [ON], recording is resumed after the previous one at the set start time.
[End] Stops the Time Lapse Shot recording. [Cancel] Returns to the recording standby screen.
- The recording is paused when the charge on the battery of the camera runs out.
- The camera does not enter the sleep mode until the set recording start time, or until the set number of pictures has been recorded.
- Group images are created when two or more pictures are recorded.
- Videos can be created from recorded group images using the [Time Lapse Video] function of the camera.
Bracketing
Multiple images are recorded by automatically changing the setting value of exposure, aperture, focus, or white balance.
- 1Tap .
- 2Tap [Bracketing] and select [Bracketing Type].
When a message to confirm Wi-Fi connection with the camera, tap [Yes].
- 3Select a recording method.
- 4Tap to record.
Select [OFF] in Step 2 to exit.
Auto Focus (AF)
If the auto focus is set on the camera, touch the screen to display the AF area to adjust the focus. The focus adjustment method can be selected depending on the position and number of the subjects.
| Item | Description |
|---|---|
| [Tracking] | When the focus mode is set to [AFC], the AF area follows the subject movement to keep the focus on the subject. |
| [Full Area AF] | The camera selects the most optimal AF area to focus from 315 areas. This is effective when a subject is not in the center of the screen. |
| [Zone (Vert./ Horz.)] | Within the full area, vertical and horizontal zones can be focused. |
| [Zone] | Within the full area, a central oval zone can be focused. |
| [1-Area+] | Emphasis within a single AF area can be focused. Even when the subject moves out of the single AF area, this remains focused in a supplementary AF area. |
| [1-Area] | Specify the position to be brought into focus. |
| [Pinpoint] | You can achieve a more precise focus on a small point. |
Manual Focus (MF)
When the manual focus is set on the camera, the MF mode is displayed to manually adjust the focus.
- 1Set the focus mode lever of the camera to Manual Focus [MF].
- 2Tap
 .
.
The MF Assist screen is displayed.
- 3Move the MF Assist position by dragging it.
- 4Use

 to adjust the focus.
 - 5Use

 to adjust the zoom magnification.
 - 6Tap [Exit].
After setting up the focus, the MF Mode screen is displayed.
- 7Tap to record.
The MF Assist screen
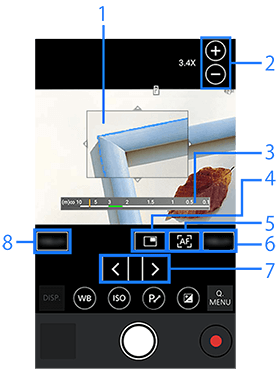
- 1.MF Assist (Enlarged window)
- 2.Zoom magnification adjustment
- 3.MF Guide
- 4.Switches magnification window (windowed mode/full screen mode).
- 5.AF
- 6.Exit the MF Assist screen
- 7.Focus adjustment
- 8.Reset the MF Assist position
About operations
In the MF mode screen, double-tap or pinch out the screen to switch to the MF Assist screen.
Pinch out/in the screen to enlarge/reduce the frame.
Double-tap the screen to exit the MF Assist.
- Cancel the Touch Shutter in advance.
1 Shot AF
Tap  to adjust the focus.
When the focus is on the subject, the AF area turns to green.
Focus Peaking
In  tab menu, tap
  to enable it to display [P] on the screen, and the focused portion is color coded.
Tap again to cancel the color coding.
Touch Shutter
Simply touch the subject to focus on to automatically adjust the focus and the shutter is fired.
- 1Tap
 .
.
- The icon turns to
 , and Touch Shutter is enabled.
- The icon turns to
- 2Tap the subject to focus on.
- When the focus is adjusted, a picture is recorded.
Canceling Touch Shutter
-
- Tap [].
The icon turns to [
] and Touch Shutter is canceled.
- Tap [
Touch AF
Optimizes the focus for the touched subject.
- 1Set the Touch AF setting on the camera to [AF].
[
 ][
][ ][Touch Settings][Touch AF][AF]
 - 2Set the focus mode lever of the camera to a setting other than [MF].
- 3Touch the subject.
The AF area frame moves to the touched position to adjust the focus.
- 4Tap to record.
- Cancel the Touch Shutter in advance.
Touch AE
You can easily optimize the brightness for a touched position.
- 1Tap
 .
.
The Touch AE adjustment screen is displayed.
- 2Touch the subject to optimize the brightness for.
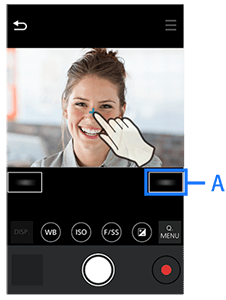
- 3Tap [Set] (A).
- This will optimize the brightness in the position touched.
- 4Tap to record.
- Tap
 to cancel the setting.
- Tap
- If the Touch AF setting on the camera is set to [AF+AE], Touch AE is not available.
Touch AF + Touch AE
Optimizes the focus and brightness for the touched subject.
- 1Set the Touch AF setting on the camera to [AF+AE].
[][][Touch Settings][Touch AF][AF+AE]
- 2Tap the subject to optimize the brightness for.
The AF area is displayed at the touched position with a dot to adjust the brightness at the center of the area.
- 3Tap to record.
- Tap
 to cancel the setting.
- Tap
- If blurring is detected, a picture with high resolution may not be composited. Fix the camera using a tripod, etc.
High Resolution Mode
Generate a picture with higher resolution based on images recorded multiple times.
- 1 (If Priority of Remote Device is )
Set the camera's drive mode dial to [
(If Priority of Remote Device is ].)
].)
Tap
[Drive Mode] and select [High Resolution Shot].
- 2Tap [High Resolution Mode Setting].
Setting Items:
[Handheld High-Res]/
[Picture Quality]/
[Picture Size]/
[Simul Record Normal Shot]/
[Shutter Delay]/
[Motion Blur Processing] - 3Tap to record.
- If blurring is detected, a picture with high resolution may not be composited. Fix the camera using a tripod, etc.
Sheer Overlay
Displays recorded pictures by overlapping on the recording screen.
- 1Set [Sheer Overlay] on the camera to [ON].
[][
 ][ON]
][ON] - 2Select the picture to overlay on the camera.
- 3Tap
 .
Is displayed on the screen, and the picture selected on the camera is displayed translucent.
.
Is displayed on the screen, and the picture selected on the camera is displayed translucent. - 4Tap to record.
Tap
to cancel the setting.