
Wi-Fi® Connection
Use Wi-Fi to connect the camera and a smartphone that does not support Bluetooth Low Energy.
- You can also connect via Wi-Fi to a smartphone that supports Bluetooth Low Energy by following the same steps.
* When pairing is set up with a smartphone that supports Bluetooth Low Energy, the camera automatically connects to the smartphone via Wi-Fi.
 Home
Home- Connecting without password authentication
- Using Password Authentication to Connect (QR Code)
- Using Password Authentication to Connect (Manual Input)
- Connecting via Network
- Connecting directly (Manual Connection)
- Connecting via tethering
- Connect to Wi-Fi Using Previously Saved Settings
- Terminating the Wi-Fi Connection
Connect without password authentication
In the initial setup, you can connect to a camera without entering a password.
Preparations
- 1Set the camera to Wi-Fi connection standby status.

 [
[ ][
][ ][Wi-Fi][Wi-Fi Function][New Connection][Remote Shooting & View]
- An SSID of the camera is displayed on the screen.
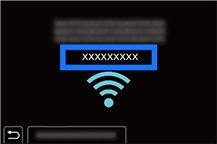
- An SSID of the camera is displayed on the screen.
Operation
- 1In the setting menu of the smartphone, enable the Wi-Fi function.
- 2Select the SSID displayed on the camera.
- 3On the smartphone, start up “LUMIX Sync”.
- 4(At the first connection)
Confirm the device name displayed on the camera and then select [Yes].
Using Password Authentication to Connect (QR code)
You can enhance Wi-Fi connection security by using password authentication through a QR code.
Preparations
- 1Set [Wi-Fi Password] on the camera to [ON].
[][][Wi-Fi][Wi-Fi Setup][Wi-Fi Password][ON]
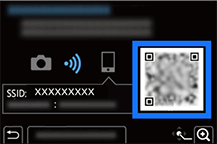
- 2Display the QR code.
[][][Wi-Fi][Wi-Fi Function][New Connection][Remote Shooting & View]
A QR code is displayed on the screen.
Operation
- 1On the smartphone, start up “LUMIX Sync”.
- 2Tap Home
 [Wi-Fi connection].
 - 3Tap [QR code].
- 4Scan the QR code displayed on the camera screen.
- Press button of the camera to enlarge the QR code.
- (iOS devices) When a message to confirm the change of destination is displayed, select [Join].
- Press
Using Password Authentication to Connect (Manual Input)
You can enhance Wi-Fi connection security by using password authentication through manual input.
Preparations
- 1Set [Wi-Fi Password] on the camera to [ON].
[][][Wi-Fi][Wi-Fi Setup][Wi-Fi Password][ON]
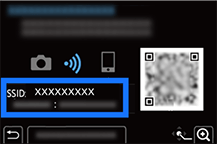
- 2Display the SSID.
[][][Wi-Fi][Wi-Fi Function][New Connection][Remote Shooting & View]
An SSID and a password are displayed on the screen.
Operation
- 1In the setting menu of the smartphone, enable the Wi-Fi function.
- 2On the Wi-Fi setting screen, select the SSID displayed on the camera.
- 3Enter the password displayed on the camera.
- 4On the smartphone, start up “LUMIX Sync”.
Connecting via Network
Connect to the camera via network.
Preparations
- 1Display the connection method setting screen for the camera.
[][][Wi-Fi][Wi-Fi Function][New Connection][Remote Shooting & View]
- 2Press [DISP.] button on the camera.
- 3Select [Via Network].
If WPS connection is selected:
For details about the operation and compatibility of WPS, refer to the operating instructions for the wireless access point. - 4(If [From List] is selected)
Select the wireless access point you are connecting to. - 5(If network authentication is encrypted) Enter the encryption key.
Operation
- 1In the setting menu of the smartphone, enable the Wi-Fi function.
- 2Connect the smartphone to the wireless access point that the camera is connected to.
- 3On the smartphone, start up “LUMIX Sync”.
Connecting directly (Manual Connection)
Connect the camera and destination device directly.
Preparations
- 1Display the connection method setting screen for the camera.
[][][Wi-Fi][Wi-Fi Function][New Connection][Remote Shooting & View]
- 2Press [DISP.] button on the camera.
- 3Select [Direct].
- 4On the camera, select the method for connecting to a wireless access point.
If WPS connection is selected:
For details about the operation and compatibility of WPS, refer to the operating instructions for the wireless access point. - 5(If [Manual Connection] is selected)
Use the smartphone to search and connect to the camera.Select the SSID displayed on the camera to connect.
Operation
- 1In the setting menu of the smartphone, enable the Wi-Fi function.
- 2On the smartphone, start up “LUMIX Sync”.
- 3(At the first connection)
Confirm the device name displayed on the camera and then select [Yes].
Connecting via Tethering
Connect by using the smartphone as a mobile router.
Preparations
- 1Enable the tethering function of the smartphone.
- 2Set [Wi-Fi Password] on the camera to [ON].
[][][Wi-Fi][Wi-Fi Setup][Wi-Fi Password][ON]
- 3On the camera, select the method for connecting to a wireless access point.
[][][Wi-Fi][Wi-Fi Function][New Connection][Remote Shooting & View]
- 4Press [DISP.] button on the camera.
- 5On the camera, select [From List].
- 6On the camera, select the network name of the smartphone (connection destination (AP)).
- 7On the camera, enter the password (security key) and select [Set].
Operation
- 1On the smartphone, start up “LUMIX Sync”.
- 2Tap Home [Wi-Fi connection] [Wi-Fi Setup].
- 3Select the SSID displayed on the camera screen, and enter the password.
Connect to Wi-Fi Using Previously Saved Settings
Preparations
- 1Display the Wi-Fi connection history on the camera.
[][][Wi-Fi][Wi-Fi Function][Select a destination from History]/[Select a destination from Favorite]
- 2Select the History item to connect to.
Operation
- 1In the Wi-Fi setup screen of the smartphone, select the SSID of the camera to connect to.
- 2On the smartphone, start up “LUMIX Sync”.
- If the settings of the device to connect to have been changed, it may not be possible to connect to the device.
Terminating the Wi-Fi Connection
Preparations
- 1Set the camera to recording mode.
Press the shutter button halfway.
- 2End Wi-Fi connection.
[][][Wi-Fi][Wi-Fi Function][Yes]
Operation
- 1On the smartphone, close the “LUMIX Sync”.