

 Camera
Transfer images or LUTs between LUMIX Lab and a connected camera.
Transferring/editing LUTs
Preparations
- Establish a Bluetooth connection or USB connection with the camera.*
*When using the DC-L10/DC-S9
- 1Tap
 > [LUT Transfer].
- Establish a Wi-Fi connection with the camera. Select [Join] to connect the devices.
- (A) Location
[Device]: LUT files stored in LUMIX Lab
[Camera]: LUT files stored on the camera
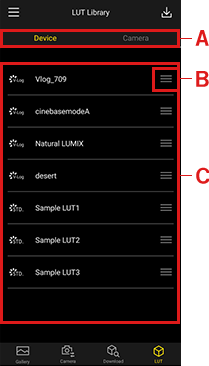
- 2Tap a LUT in (C).
- You can rename or delete the LUT.
- 3Select [Transfer to Camera] or [Send to Device].
- To rearrange LUTs, drag
 (B) up or down.
 - Up to 10 LUTs can be selected and transferred at the same time.
They will be sequentially transferred to the topmost available spaces of the [Camera]'s LUT library.
Importing images from a camera
Transfer images from a card in the camera to the LUMIX Lab gallery.
Preparations
- Establish a Bluetooth connection or USB connection with the camera.*
*When using the DC-L10/DC-S9
- 1Tap > [Transfer Photo / Video].
- Establish a Wi-Fi connection with the camera. Select [Join] to connect the devices.
The camera gallery screen is displayed.
- Establish a Wi-Fi connection with the camera. Select [Join] to connect the devices.
- 2Select an image.
- For faster transfers, enable [Compress JPEG] to reduce the size of photos transferred.
- To select group images, use the playback screen.
- 3Tap
 .
.
- Images in the following formats can be transferred.
[Photos]: RW2, JPEG, HEIF*
[Videos]: MP4 (H.264/MPEG-4 AVC, H.265/HEVC)
*Using the DC-L10/DC-S1M2/DC-S1M2ES - The following images cannot be transferred.
– Images with a file size exceeding 4 GB
– Video in MOV or Apple ProRes formats
– MP4 video at a resolution higher than 8K - Saving and playback may not be supported on some models of smartphone. Check the smartphone specifications for supported images.
- Photos in RAW format may not be displayed correctly on some models of smartphone or in some OS versions.
- Images that cannot be saved to the smartphone are excluded from these operations.
Sending Images on the Camera to a Smartphone with Simple Operations
Simply press the [Q] button of the camera while playing back the images on the camera to transfer the image to the smartphone connected via Bluetooth.
Preparations
- Establish a Bluetooth connection or USB connection with the camera.*
*When using the DC-L10/DC-S9
- 1Press
 button on the camera to display the playback screen.
 - 2Select images on the camera to transfer.
Send a single image
- Press

 to select the image.
 - Press [Q] button.
- Select [Single Select].
- Establish a Wi-Fi connection with the camera. Select [Join] to connect the devices on the smartphone.
Send multiple images
- Press [Q] button.
- Select [Multi Select].
- Select the images and then transfer.
: Select imagesWith DC-L10 / DC-S9
 : Set/Cancel
With DC-S1M2 / DC-S1M2ES / DC-S1M2NT / DC-S1RM2 / DC-GH7 / DC-S5M2 / DC-S5M2X, or DC-G9M2
or  : Set/Cancel[DISP.]: Transfer
- Establish a Wi-Fi connection with the camera. Select [Join] to connect the devices on the smartphone.
- Press
Using the menu to transfer easily.
- 1On the camera, select [Send Image (Smartphone)].
 [
[ ] [
] [ ] [Bluetooth] [Send Image (Smartphone)]
・Settings: [Single Select] / [Multi Select]
- 2(When [Single Select] is selected)
Use to select an image, or press the to transfer the image.
(When [Multi Select] is selected)
Use the same procedure as “Send multiple images” (from Step 3) of the Q button.
- The following images cannot be transferred.
– Images with a file size exceeding 4 GB
– Video in MOV or Apple ProRes formats
– MP4 video at a resolution higher than 8K - Images cannot be sent when [Auto Transfer(Wi-Fi)] is turned on.
Automatically transferring images
Each image captured with the camera can be transferred to the smartphone automatically after you shoot.
Preparations
- Establish a Bluetooth connection with the camera.
- 1Tap .
- 2Turn on [Auto Transfer(Wi-Fi)].
- Establish a Wi-Fi connection with the camera. Select [Join] to connect the devices.
- 3Select [Size] and [File Format] on the camera.
- 4Tap
 /
/ to record.
- [
 ] is displayed on the camera recording screen during file transfer.
 - This function can be turned on or off from either the camera or the smartphone when the devices are connected via Wi-Fi.
- Automatic image transfer is not available unless [
 ] is displayed on the camera recording screen.
If it is not displayed, check the status of the Wi-Fi connection with the camera. - No other operations can be performed during image transfer.
- Automatic image transfer is not available for images captured with the camera set as follows.
– Recording mode set to video recording (other than MP4 Lite video) - <DC-L10 / DC-S9>
[Auto Transfer(Wi-Fi)] is not available when connected via USB.
Ending automatic image transfer
- 1Tap .
- 2Turn off [Auto Transfer(Wi-Fi)].
- The Wi-Fi connection to the camera is disconnected.