
![]() Digital AV Support > Audio > Wireless Speaker System > SH-WL30
Digital AV Support > Audio > Wireless Speaker System > SH-WL30
SH-WL30
Features
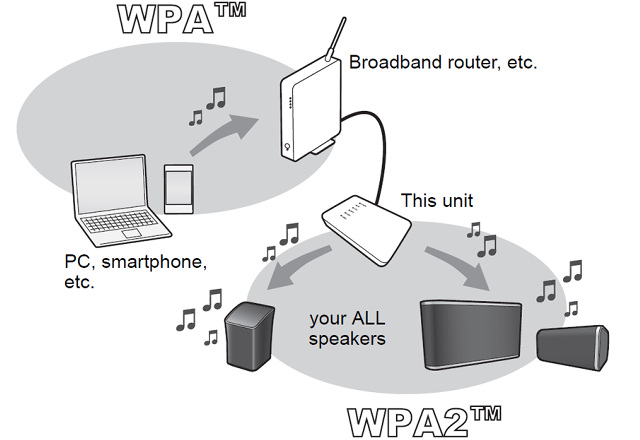
This unit allows you to convert the security type of your home Wi-Fi® environment from WPA™ to WPA2™.
If your Broadband router supports WPA2™, this unit is not necessary.
Manuals & Guides
FAQ
Control reference guide
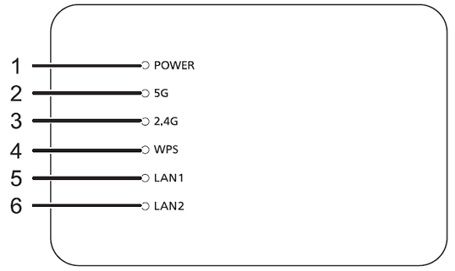
- 1. Power indicator
- Lights up This unit is on.
- 2. 5 G indicator
- Blinks/Lights up The 5 GHz band (11n/a) is available.
- 3. 2.4 G indicator
- Blinks/Lights up The 2.4 GHz band (11n/g/b) is available.
- 4. WPS indicator
- Blinks The WPS feature is enabled.
- 5. LAN1 indicator
- Lights up A LAN cable is connected to the LAN1 terminal.
- 6. LAN2 indicator
- Lights up A LAN cable is connected to the LAN2 terminal.
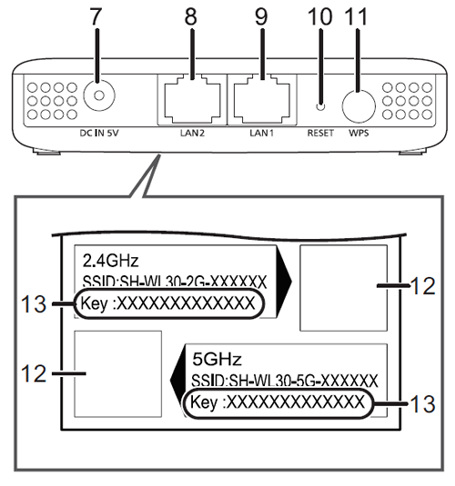
- 7. DC IN terminal
- DC 5 V 1.8 A
- 8. LAN2 terminal
- 9. LAN1 terminal
- 10. RESET button
- Resets this unit to the factory default settings.
Use a paper clip or similar to press this button when this unit is not working correctly, for example. - 11. WPS button
- 12. QR code
- 13. Key
Preparation
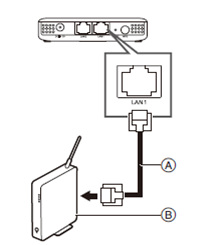
- A. LAN cable (supplied)
- Do not use any other LAN cable except the supplied one.
- B. Broadband router, etc
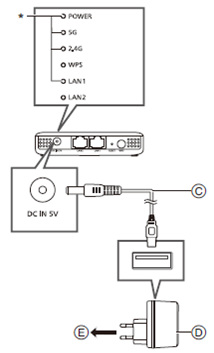
- C. DC cable (supplied)
- Check the directions of the connectors, and plug them straight in or unplug them straight out.
(Otherwise the connectors may bend out of shape, which may cause malfunction.) - D. AC adaptor (supplied)
- E. To power outlet
- The indicators (*) light up in blue after approximately 60 seconds.
Network settings
Choose a network setting method from the following.
Characteristics of radio wave frequency bands
- 5 GHz frequency band
- Normally not used by devices other than routers. As a result, it provides very reliable connections and stable performance.
- Offers faster communication speeds than the 2.4 GHz band.
- More sensitive to obstacles such as walls and floors than the 2.4 GHz band. Radio waves become weaker over longer distances communication.
- Older Wi-Fi devices may not support the 5 GHz band.
- 2.4 GHz frequency band
- Offers superior penetration of obstacles such as walls and floors, allowing radio waves to travel longer distances.
- Supported by most Wi-Fi devices.
- Prone to congestion and unstable performance because it is used by a wide variety of products.
(In an apartment or condominium building, for example, you may also experience radio wave interference from devices in other rooms.)
Do not connect a LAN cable to ALL speaker. Doing so will disable the
Download and start the app "Panasonic Music Streaming" (free of charge) on your smartphone.
[iOS] : App Store
[Android] : Google Play™
Open the app and follow the on-screen instructions.
Launching the application

Tap the Music Stream icon on your Android™ device to launch Panasonic Music Streaming.
Searching for AllPlay-compatible speakers
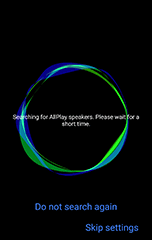
Launching the application will start searching for AllPlay-compatible speakers.
If the AllPlay-compatible speakers have already been set, or the setting is unnecessary, tap either [Do not search again] or [Skip settings].

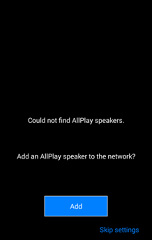
Or,
On the "Speaker" screen, tap ![]() > [Add AllPlay speaker] to display the "Speaker selection" screen.
> [Add AllPlay speaker] to display the "Speaker selection" screen.
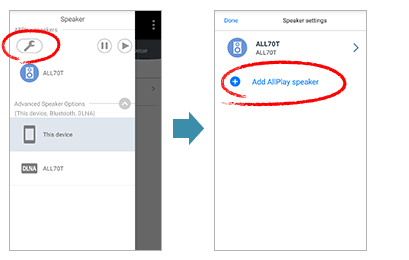
Follow the app's instructions to connect to your ALL speaker.
The following steps are based on a smartphone.
- Turn on your ALL speaker.
- You may need to configure the ALL speaker manually.
For details, refer to the Operating Instructions for the ALL speaker.
- You may need to configure the ALL speaker manually.
- Go to Wi-Fi® settings on the device.
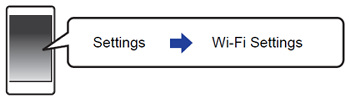
- Select "AllPlay
 _AJ" to connect to this unit.
- "
 " stands for a character that is unique to each set.
 - This can take up to 1 minute to appear in your Wi-Fi list.
- If this operation does not work correctly, please repeat it several times.
- Make sure that DHCP is enabled for the network setting on your compatible device.
[iOS_device]: The settings page will be automatically displayed in the Internet browser.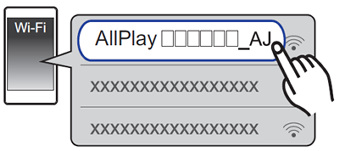
[Except_iOS_device]: Open the Internet browser and refresh the page to display the settings page.
- If the settings page is not displayed, input "http://172.19.42.1/" into the URL address field.
- "
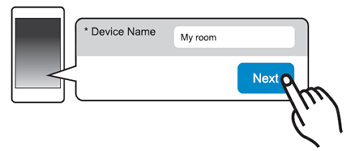
- Input a device name and then select "Next".
- The device name will be displayed as this unit's name on the network.
- The guaranteed limit is 32 characters.
- The device name is set when "Next" is selected.
- You can also change the device name after the network connection is set up.
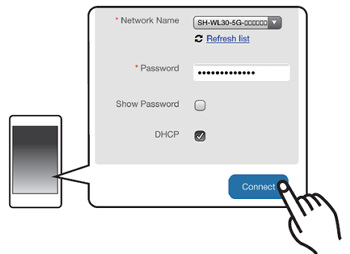
- Change the network name (SSID) to "SH-WL30-5G-"
or "SH-WL30-2G-" and input the password (Key) for
this unit (refer to the bottom side of the unit).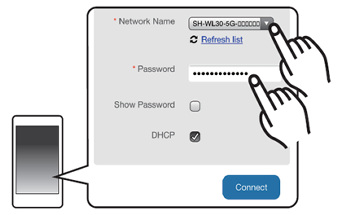
- Select "Connect" to apply the settings.
- Refer to the Operating Instructions for your ALL speaker for information on how it operates when the connection is complete.
- Depending on the device, the connection complete screen may not be displayed.
If the network indicator does not light up, check the network name (SSID) and the password, and then try the setting again.
- Make sure to connect your compatible device back to your home wireless network.
Enable Java and cookies in your browser settings.- You can change the user name and password. (l 26, "Password Setup")
Do not connect a LAN cable to ALL speaker. Doing so will disable the Wi-Fi function.
- Set your ALL speaker to WPS Connection mode.
- For details, refer to the Operating Instructions for the ALL speaker.
- Press and hold the WPS button on this unit for at least 3 seconds.
- The WPS indicator blinks. The WPS indicator blinks for about 2 minutes until the connection is completed.
- When the connection is complete, the WPS indicator will light up for about 10 seconds.
- The default setting is 5 GHz.
- Go to the advanced setup screen to switch to 2.4 GHz.
- The WPS indicator blinks fast for about 1 minute when a connection attempt fails.
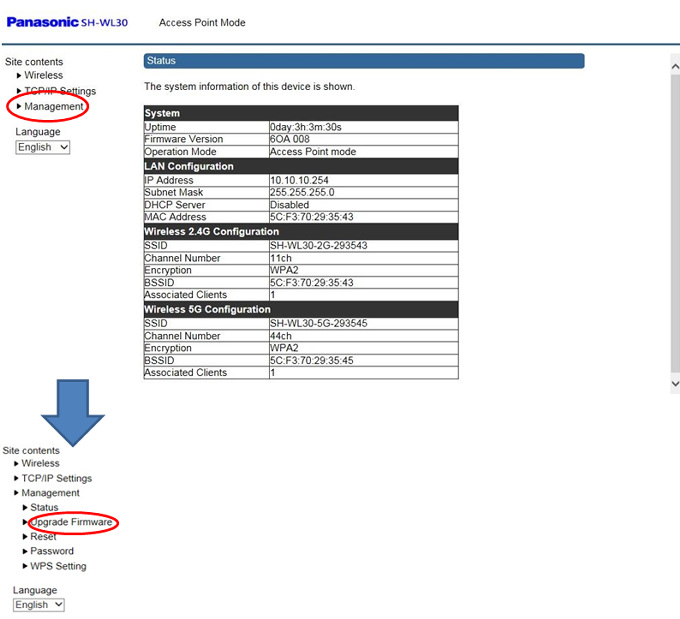
You can change this unit's name on the network, and use specific IP address, etc.
Preparation
- Change the IP address settings of the device (PC, etc.) to the ones below.
- For details on how to change these settings, refer to the operating instructions for your device.
- IP Address: "10.10.10." ("" stands for any number between 1 and 253.)
- Subnet mask: "255.255.255.0"
- Connect this unit and the device
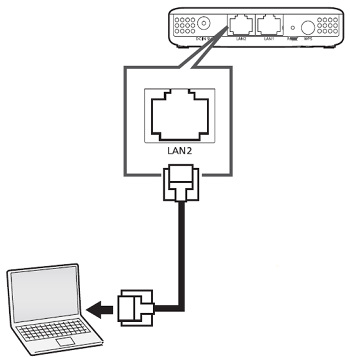
IP address
Default : 10.10.10.254
IP Address: "10.10.10." ("" stands for any number between 1 and 253.)
Subnet mask: "255.255.255.0"
- Start an Internet browser on your device and then input "http://10.10.10.254/" into the address field to display the settings page.
- Input user name and password and select "OK".
- When performing this step for the first time, enter "admin" into both the ID and password fields.
- It may take a few minutes until the settings page is displayed depending on the environment. In that case, reload the browser.
- If you enter a wrong ID or password, close the Internet browser first, and then follow the steps above again.
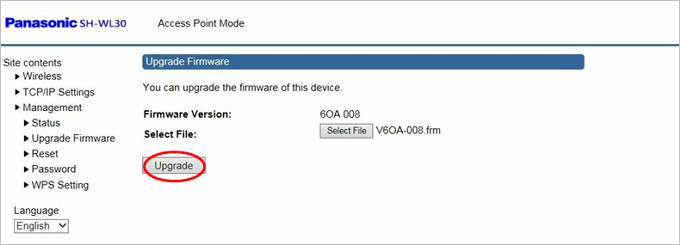
This page allows you upgrade the firmware to new version.
Please note, do not turn off the unit during the upload because it may crash the system.
Click "Upload" to update the selected web firmware image to this unit
- Change the IP address settings of the device (PC, etc.) to the ones below.
- For details on how to change these settings, refer to the operating instructions for your device.
- IP Address: "10.10.10." ("" stands for any number between 1 and 253.)
- Subnet mask: "255.255.255.0"
- Connect this unit and the device
/support/global/cs/audio/download/wl30/
(Update file is not available yet)
Example: Save the file to the desktop of your computer.
 .frm" ("" stands for a character that is unique to each set).
Example: Save the file to the desktop of your computer.
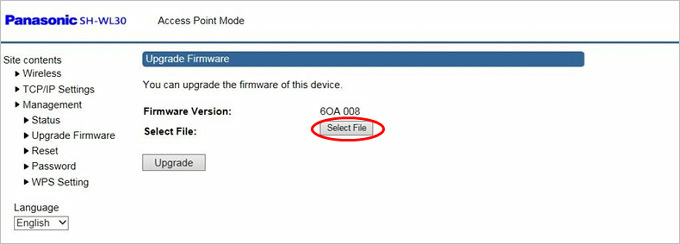
Select "V6OA-.frm" ("" stands for a character that is unique to each set).
Please note, do not turn off the unit during the upload because it may crash the system.
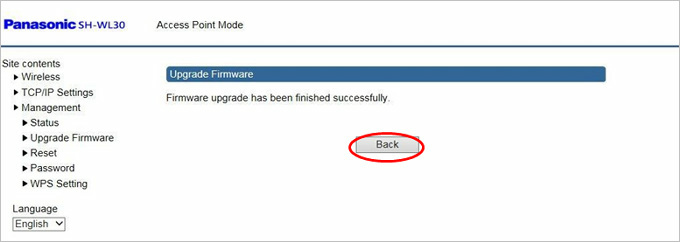
After the firmware is installed, "Finish" will be displayed.
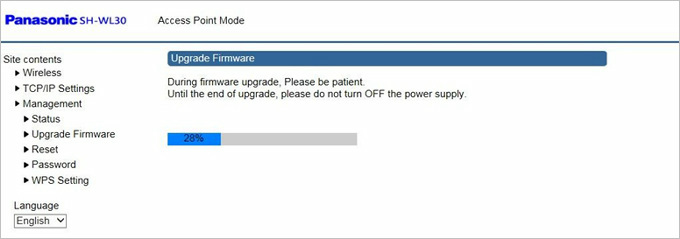
Downloading will require several minutes. It may take longer or may not work properly depending on the connection environment.
FAQ
| Question | Answer |
|---|---|
| Cannot turn on the unit. |
|
| The indicators do not light up. |
|
| Cannot connect to the ALL speaker. |
|
| The speaker is frequently disconnected. |
Is this unit or the Wi-Fi router placed on the floor? The radio signal condition is poor in locations close to the floor. Place them on a desk or similar object so that they are about 1 m above the floor.
|
| Cannot display the web setup screen. |
Check to see if this unit and PC are connected correctly.
|
| Cannot log in to the web setup screen. |
Check the user name and password.
|
| Cannot update the firmware. |
Check the software file was downloaded correctly from the support site.
|
| This unit does not turn on after a firmware update. |
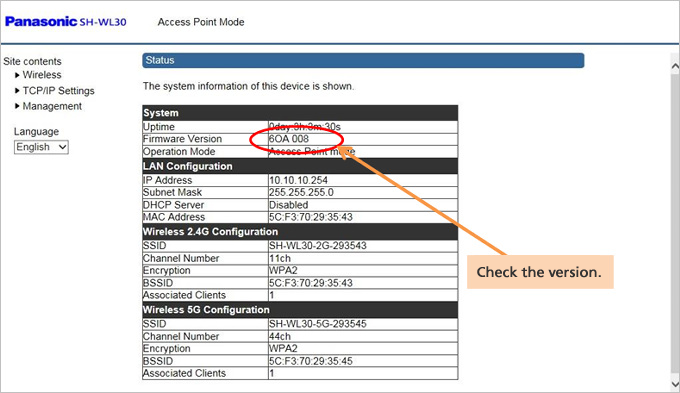
If only the power indicator lights up when LAN cables are not connected, the update may not have been completed correctly. Follow the steps below to update the firmware again. (Connect the PC to the same network as this unit.)
|