
Remote Shooting
Various functions can be used to record images. The displayed icons vary depending on the digital camera or other settings.

Preparations
- 1Make a Wi-Fi connection to the camera.
- 2Tap Home

 [Remote shooting].
- (iOS devices) When a message to confirm the change of destination is displayed, select [Join].
The recording screen is displayed.
Shooting
Shooting Pictures
- 1Tap
 .
.
- Recordings are made in succession while is long tapped.
- Recordings are made in succession while
Recording Videos
- 1Tap
 .
.
- Video recording starts. Tap again to stop recording.
- If the recording settings are changed during recording a video, the icons on the recording screen may not be updated.
4K Photos
With 4K Photo, you can take a high-speed burst of pictures at 30 frames/second and save the desired pictures, each made up of 8 million pixels (approx.), extracted from their burst file.
- 1Tap
 [Drive Mode], select [4K PHOTO], and set [Rec Method].
- 2Tap to record.
Item Tap method and count of the shutter button Recording is performed 4K Burst Long tapWhile being tapped
Audio recording: None4K Burst(S/S) Twice
(Start/end recording)From the beginning to the end of the recording
Audio recording: Available*4K Pre-Burst OnceApprox. one second before and after tapping it
Recording duration: Approx. 2 seconds
Audio recording: None*Audio is not played back when the recording is playback on the camera.
Adding markers to specific scenes during shooting
Tap  during [4K Burst(S/S)] recording to add markers. The added markers can be viewed on the camera.
- Up to 40 markers can be added.
Post-Focus
The camera can perform Burst recording in the same picture quality as 4K photo recording while automatically shifting the focus to different areas.
- 1Tap [Drive Mode], and tap [Post-Focus].
- 2Tap .
Release the finger from
to start post-focus recording.
When [Recording in post-focus] disappears, recording finishes.
Select [OFF] in Step 1 to exit.
Bracketing
Multiple images are recorded by automatically changing the setting value of exposure, aperture, focus, or white balance.
- 1Tap .
- 2Tap [Bracketing] and select [Bracketing Type].
- 3Select a recording method.
- 4Tap to record.
Select [OFF] in Step 2 to exit.
Auto Focus (AF)
If the auto focus is set on the camera, touch the screen to display the AF area to adjust the focus. The focus adjustment method can be selected depending on the position and number of the subjects.
| Item | Description |
|---|---|
| [Face/Eye Detection] | Recognizes people's faces and eyes, adjusts focus point and exposure. |
| [Tracking] | When the focus mode is set to [AFC], the AF area follows the subject movement to keep the focus on the subject. |
| [49-Area] | The camera selects the most optimal AF area to focus from 49 areas. This is effective when a subject is not in the center of the screen. |
| [Custom Multi] | The user can select an area from 49 areas and make a custom registration.
* The AF area reflects the setting on the camera. The AF area's settings cannot be customized from this application. Configure the settings for the digital camera in advance. When tapping your smartphone screen, it won't adjust the focus point. |
| [1-Area] | Specify the position to be brought into focus. |
| [Pinpoint] | You can achieve a more precise focus on a small point. |
Manual Focus (MF)
When the manual focus is set on the camera, the MF mode is displayed to manually adjust the focus.
- 1Set the Focus Mode on the camera to Manual Focus [MF].
- 2Tap
 .
.
The MF Assist screen is displayed.
- 3Move the MF Assist position by dragging it.
- 4Use

 to adjust the focus.
 - 5Use

 to adjust the zoom magnification.
 - 6Tap [Exit].
After setting up the focus, the MF Mode screen is displayed.
- 7Tap to record.
The MF Assist screen
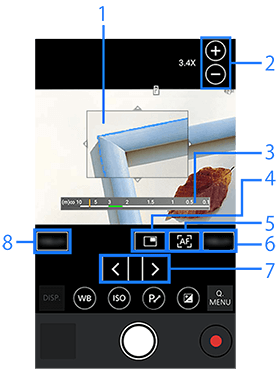
- 1.MF Assist (Enlarged window)
- 2.Zoom magnification adjustment
- 3.MF Guide
- 4.Switches magnification window (windowed mode/full screen mode).
- 5.AF
- 6.Exit the MF Assist screen
- 7.Focus adjustment
- 8.Reset the MF Assist position
About operations
In the MF mode screen, double-tap or pinch out the screen to switch to the MF Assist screen.
Pinch out/in the screen to enlarge/reduce the frame.
Double-tap the screen to exit the MF Assist.
- Cancel the Touch Shutter in advance.
1 Shot AF
Tap  to adjust the focus.
When the focus is on the subject, the AF area turns to green.
Focus Peaking
In  tab menu, tap
  to enable it to display [P] on the screen, and the focused portion is color coded.
Tap again to cancel the color coding.
Touch Shutter
Simply touch the subject to focus on to automatically adjust the focus and the shutter is fired.
- 1Tap
 .
.
- The icon turns to
 , and Touch Shutter is enabled.
- The icon turns to
- 2Tap the subject to focus on.
- When the focus is adjusted, a picture is recorded.
Canceling Touch Shutter
-
- Tap [].
The icon turns to [
] and Touch Shutter is canceled.
- Tap [
Touch AF
Optimizes the focus for the touched subject.
- 1Set the Touch AF setting on the camera to [AF].
 [
[ ][
][ ][Touch Settings][Touch AF][AF]
 - 2Set the Focus Mode on the camera to a setting other than [MF].
- 3Touch the subject.
The AF area frame moves to the touched position to adjust the focus.
- 4Tap to record.
- Cancel the Touch Shutter in advance.
Touch AE
You can easily optimize the brightness for a touched position.
- 1Tap
 .
.
The Touch AE adjustment screen is displayed.
- 2Touch the subject to optimize the brightness for.
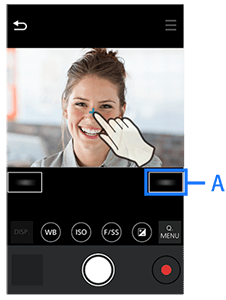
- 3Tap [Set] (A).
- This will optimize the brightness in the position touched.
- 4Tap to record.
- Tap
 to cancel the setting.
- Tap
- If the Touch AF setting on the camera is set to [AF+AE], Touch AE is not available.
Touch AF + Touch AE
Optimizes the focus and brightness for the touched subject.
- 1Set the Touch AF setting on the camera to [AF+AE].
[][][Touch Settings][Touch AF][AF+AE]
- 2Tap the subject to optimize the brightness for.
The AF area is displayed at the touched position with a dot to adjust the brightness at the center of the area.
- 3Tap to record.
- Tap
 to cancel the setting.
- Tap