
Import Images | Basic Operations
Make a Wi-Fi connection to the camera, and import the images stored in the camera to the smartphone to playback and save these images.

Preparations
- 1Connect to a camera.
- 2Tap Home

 [Import images].
- (iOS devices) When a message to confirm the change of destination is displayed, select [Join].
Basic Operations
The images stored in the camera are displayed as thumbnails (multi playback).
Tap a thumbnail to display one image.
Thumbnail display
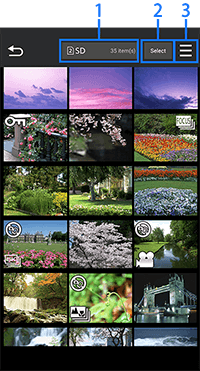
- 1. Switch the destinations
- 2. Select images
- 3. Transfer image menu
* Images are displayed in the descending order of the recording date and time.
* Scroll up or down the screen to display previous or next thumbnails, respectively.
* Tap a thumbnail in group images to display the list of the images in the group.
(This function is not available in the models that the recording setting does not support.)
* Tap [Select] to display  (Transfer image) and
  (Rating) at the lower area of the screen.
Meaning of the icons
 |
Video |
|---|---|
 * * |
Segmented File Recording |
| Burst (Picture saved using [6K/4K PHOTO Bulk Saving]) |
|
 * * |
Time Lapse Shot |
 * * |
Stop Motion Animation |
 * * |
Focus Bracket |
 / / |
6K/4K Photo (6K/4K burst file) |
 |
Post Focus |
 |
Protected picture (Images protected on digital camera) |
 |
Rating |
| Images that cannot be saved to a smartphone |
*Group images
Single image display
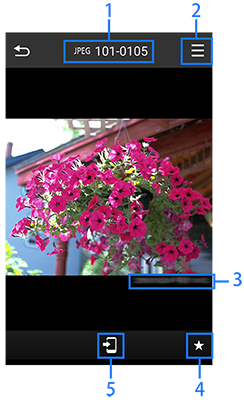
- 1. Image format/file name
- 2. Transfer image menu
- 3. Recording date and time
- 4. Rating
- 5. Transfer image
* Flick the screen to left and right to display previous or next images, respectively.
* For videos and [6K/4K PHOTO] images,  is displayed at the center of the screen. Tap it to play back the video or image.
- If the radio wave is weak, it may take time to display thumbnails or playback high definition videos, or you may experience slow performance.
- When displaying enlarged images, there may be some grid-shaped noise in the enlarged image. This noise appears when the image is enlarged, and it does not mean that there is noise in the original image.
- Images may not be saved or displayed on some the smartphone models. Refer to the specification of your smartphone for the supported image types.
- Depending on your smartphone or its OS version, pictures in RAW format may not be displayed correctly.
- For the images that cannot be played back with this application, “!” thumbnail is displayed.
- Images in the camera cannot be deleted.
Switching the Destinations
- 1Tap
 /
/ .
. - 2Tap the desired destination.
The destination switches.
- The destination is the card inserted in either the card slot 1 or the card slot 2 of the camera connected via Wi-Fi.
- If no card is inserted into the camera, card slot 1 is displayed.
- Displaying may be slow.
Selecting Images
- 1Tap
 in the thumbnail display.
- Thumbnails have
 , allowing them to be selected.
- Thumbnails have
- 2Tap the thumbnail of the image to select.
- The thumbnails of the selected images will have
 .
. - Tap [Cancel] to exit the selection screen.
- The thumbnails of the selected images will have
Filtering Images
You can filter images by the recording period, image type, and rating.
- 1Tap
 in the thumbnail display, and enable [Filtering].
 - 2Select filtering items
Setting Items:
Recording period, Image types, Rating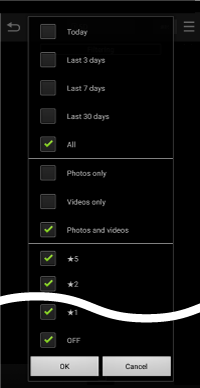
- 3Tap [OK].
The thumbnails of the filtered images are displayed.
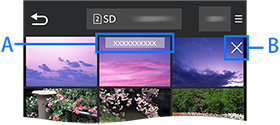
A Edit setup
B Cancel filtering
Canceling Filtering
- 1Tap in the thumbnail display screen.
- 2Disable [Filtering].
- Or tap [☓] (B).
- In the list where a thumbnail of group images, [Filtering] is not available.
Setting the Rating
- 1Tap to select images.
- This step is not required for single image display.
- 2Tap to select a rating level (1 – 5).
Tap [Cancel] to exit.
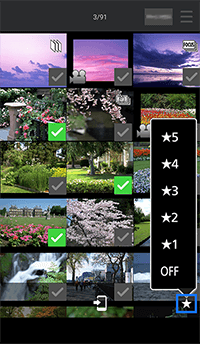
- For [AVCHD] videos, only [OFF] or [5] can be selected.
- If multiple images are selected and a rating other than [OFF] is selected, [AVCHD] videos are set to [★5].
- This rating cannot be applied to images protected by the camera.
Importing images to the smartphone
Transfer the images stored in the card in the camera to the smartphone.
- 1Connect to a camera.
- 2On the smartphone, start up “LUMIX Sync”.
- 3Tap Home [Import images].
- (iOS devices) When a message to confirm the change of destination is displayed, select [Join].
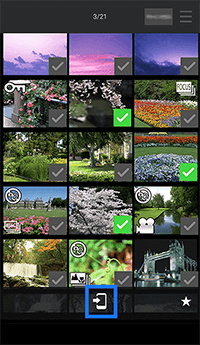
- 4Tap to select images.
- This step is not required for single image display.
- 5Tap
 .
.
The selected images are stored in the smartphone.
- If images with [Protect] setting enabled on the camera are transferred to the smartphone, the protection is not setup for these images transferred to the smartphone.
- Images that cannot be saved to the smartphone are excluded.
- (When playing back a single image) Images that cannot be saved to the smartphone, is displayed in gray and disabled for selection.
The following images cannot be saved to the smartphone.
- – MPO+JPG
- – RAW*1
- – RAW+JPG*2
- – AVCHD
- – [MP4] 4K videos
- – [MP4 HEVC] videos
- – [MOV] videos
- – 6K/4K PHOTO
- – Post-Focus
- – HLG Photo (HLG format pictures)
- – Images with
 displayed on the thumbnail*3
*1 For Android 7.0 or earlier
*2 For Android 7.0 or earlier, only the JPEG files associated with the RAW file are saved to the smartphone. (The RAW file is not saved.)
*3 There is a possibility that even if the icon is not displayed, depending on the model of your smartphone, you will be unable to save.
- When copying images from the camera to the smartphone, it may take time depending on the Wi-Fi radio wave environment.
- Depending on the type of smartphone, you may not be able to save or play. Please check your smartphone specifications to confirm compatible video types.
- Group images cannot be transferred/saved in bulk.
- 3D pictures (MPO format) are played back/saved as 2D pictures (JPEG).
- Images saved to the smartphone can be viewed using “Gallery” or “Photos” app in the smartphone.