
 Gallery
Adding images to the app makes them available for playback or editing. Editing details can be saved as a LUT.
Editing/saving images
- 1Tap
 .
. - 2Tap a thumbnail.
- 3Tap
 .
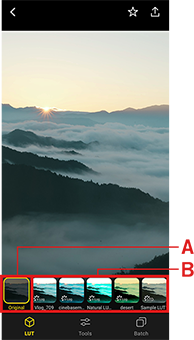
. - 4Select a listed LUT to use in editing.
A [No LUT]: Original file, without a LUT applied
B: LUTs in the LUMIX Lab LUT library
- 5Tap
 to adjust the image quality.
 - 6Tap
 .
. - 7Select [Save].
- An image with your edited settings applied is saved to the smartphone device library.
- Touch and hold a preview image to see the original image before editing.
- Thumbnails of images that have editing information are identified by on the thumbnail in the list.
- HEIF-formatted photos are converted from 10 bits to 8 bits during editing.
This conversion does not affect the original image. - LUTs in the LUMIX Lab LUT library can be applied to images during editing.
- The photo style can be changed in RW2. (It cannot be changed in JPEG/HEIF/video.)
- Editing functions in LUMIX Lab version 3.0.0 or later are not compatible with data edited in LUMIX Lab version 2.0.4 or earlier.
- To edit images previously edited in version 2.0.4 or earlier using LUMIX Lab version 3.0.0, please reset the edits. If you want to preserve the color adjustments, save them as a LUT before resetting, then load it using the functions in version 3.0.0 or later.
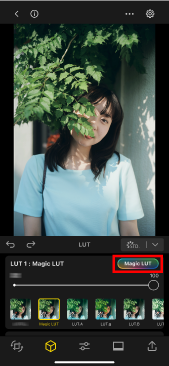
Magic LUT
3D LUTs are automatically generated from the reference image, allowing the same color tones to be reproduced in other photos.
- 1Tap .
- 2Tap a thumbnail.
- 3Tap .
- 4Tap [Magic LUT].
- The PhotoPicker screen is displayed.
- 5Select a photo to which you want to apply the color tone reproduction.
- Magic LUT is performed.
Once completed, an AI-generated LUT is applied to the image.
- Magic LUT is performed.
- The generated LUT is temporarily saved under the name of "Magic LUT."
- To save it in the LUT library, tap and select [Create LUT].
- Magic LUT cannot be performed while editing the following images.
- Images recorded with Real Time LUT
- Images recorded with the following Photo Style settings.
- Monochrome
- L.Monochrome
- L.Monochrome D
- L.Monochrome S
- LEICA Monochrome
- Like2100(HLG)
- Like2100(HLG) Full Range
- Hybrid Log Gamma
- Standard(HLG)
- Monochrome(HLG)
- Supported file formats for reference images
- – JPEG
- – PNG
- – HEIF
- – BMP
*Only pictures are supported.
Creating LUTs
- 1Tap .
- 2Tap a thumbnail.
- 3Tap .
- 4Select [Create LUT].
- 5Enter a name and tap [Set].
- Your new LUT is added to LUMIX Lab LUT library.
- It is saved as a 3D LUT file in 33-grid Cube format.
Recording image quality adjustment information to a LUT
When creating a LUT with [Add Image Qlty. Adj. Info] enabled, you can save the values used during editing in the LUT as image quality adjustment information.
In future edits, applying the LUT containing recorded image quality adjustment information will automatically apply those adjustments to your edits.
Transfer the LUT containing recorded image quality adjustment information to your camera to shoot using Real Time LUT, with the adjustments automatically applied.
You can check the list of supported models below that allow for the loading of image quality adjustment information.
Please check the following for the correspondence between the setting values recorded in LUMIX Lab and those applied in the camera.
(A) Base Photo Style is other than [V-Log]
(B) Base Photo Style is [V-Log]
| Image Quality Adj. Info. | Value | ||
|---|---|---|---|
| Camera | LUMIX Lab | ||
| (A) | (B) | ||
| Grain Effect | OFF | – | 0 |
| LOW | – | 1–33 | |
| STD | – | 34–66 | |
| HIGH | – | 67–100 | |
| Color Noise | ON | – | 0 |
| OFF | – | 1 | |
| Sharpness/ Noise Reduction |
-5 | 0 | 0–4 |
| -4.5 | +0.5 | 5–9 | |
| -4 | +1 | 10–14 | |
| -3.5 | +1.5 | 15–19 | |
| -3 | +2 | 20–24 | |
| -2.5 | +2.5 | 25–29 | |
| -2 | +3 | 30–34 | |
| -1.5 | +3.5 | 35–39 | |
| -1 | +4 | 40–44 | |
| -0.5 | +4.5 | 45–49 | |
| 0 | +5 | 50–54 | |
| +0.5 | +5.5 | 55–59 | |
| +1 | +6 | 60–64 | |
| +1.5 | +6.5 | 65–69 | |
| +2 | +7 | 70–74 | |
| +2.5 | +7.5 | 75–79 | |
| +3 | +8 | 80–84 | |
| +3.5 | +8.5 | 85–89 | |
| +4 | +9 | 90–94 | |
| +4.5 | +9.5 | 95–99 | |
| +5 | +10 | 100 | |
Editing S&Q (Slow & Quick)
You can easily change the video speed with simple controls (speed ramping).
- 1Tap .
- 2Tap the thumbnail of the video you will edit.
- 3Tap
 .
.
- The screen switches to the frame selection screen.
- 4Tap
 to switch to S&Q mode.
 - ·Straight line: You can change the playback speed of an entire video to a specific speed.
- ·Curved line: You can change the playback speed for each section.
- 5Tap .
- 6Select [Save video].
- A video with your changes applied is saved to your smartphone's device library.
- When the speed is set to 5x (Quick) or higher for both straight line and curved line, the audio for the entire video will be deleted before saving.
- When the frame rate drops below 24p after applying the slow motion effect, playback may not be smooth.
Editing videos at 60p or 120p or higher is recommended.
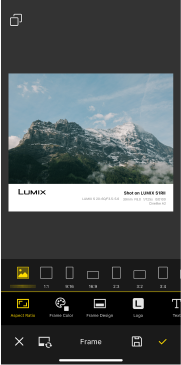
Adding/editing photo frames
You can add customized frames to photos. Your new frame can be saved as "My Frame."
- 1Tap .
- 2Tap the thumbnail of the photo you will edit.
- 3Tap
 .
.
- The screen switches to the frame selection screen.
- 4Switch to the frame you will browse.
- Switch to the [Template] or [My Frame] tab and select the frame you will browse.
- 5Tap the frame you will use.
- The selected frame is applied to the photo.
- 6Select an item you want to edit and adjust the frame. (→Setting items)
- 7Tap
 to finish editing.
- Frame editing mode will close.
- 8Tap .
- Save the photo by selecting [Save photo].
A framed image with your edited settings applied is saved to your smartphone's device library.
- Save the photo by selecting [Save photo].
〈Setting items〉
|
|
You can change an added frame. |
|
You can change the frame aspect ratio. |
|---|---|
|
|
You can change the frame color and add the blur effect to the frame. |
|
|
You can adjust the frame width and position. |
|
|
You can change the type of the LUMIX logo and show or hide it. |
|
|
You can adjust the text displayed on the frame. |
|
|
You can change the text display position. |
|
|
You can change the text color. |
|
|
You can change the text color. |
- You cannot add frames to videos.
- Save a frame, then select the My Frame tab again to enable editing.
- Exif Information may not be displayed correctly on some image files.
Saving My Frame
- 1Tap .
- 2Tap a thumbnail.
- 3Tap
 (Tools).
- The image editing tool opens.
- 4Tap
 (Frame).
- The screen switches to the frame selection screen.
- 5Switch to the frame you will browse.
- Switch to the [Template] or [My Frame] tab and select the frame you will use.
- 6Tap [Frame] and select an item you want to edit, then adjust the frame. (→Setting items)
- 7Tap
 and select a saving method.
- Save as: It will be saved as a new frame.
- Save: The existing My Frame will be overwritten.
- 8Enter a name and tap [Set].
- A frame with your edited settings applied is saved to the [My Frame] tab.
- If you tap
 , the settings will apply regardless of which frame is selected.
This is useful when you want to apply common settings to all frames, regardless of the selected frame.