
![]() Digital AV Support > Digital AV Software > Image App > Image App (Android) - Digital Video Camera -
Digital AV Support > Digital AV Software > Image App > Image App (Android) - Digital Video Camera -
Image App (Android) - Digital Video Camera -
Editing
Take your favorite still pictures and combine them together on one image on your own.
- Preparation : Connect smartphone to video camera via Wi-Fi.
- Tap

- Tap [Photo Collage]

- Pick a frame
The frame selection screen is displayed.
Tap the frame you want to use.- The number of still pictures you can use will vary depending upon the frame.
- Choose a still picture*
The still picture thumbnails are displayed.- Please put a check mark in the thumbnails of the still pictures you want to insert into the frame.
*If the digital camera is not connected, the thumbnails of still pictures saved in [Gallery] will be displayed.
- Please put a check mark in the thumbnails of the still pictures you want to insert into the frame.
- Tap [Execute]
It will begin to insert the still pictures into the selected frame.- If you want to change the photo frame, please tap
 .
. - If you want to change the still pictures, please tap the smartphone's back button, and please reselect still pictures from step 4.
- If you want to change the photo frame, please tap
- Tap
 and save the edited image
The message [The pictures have been saved.] will be displayed.- To conclude editing in photo frame, tap [Exit].
- Tap
- Images that have been edited once cannot be re-edited later.
- iFrame videos and videos saved in MP4 are not supported.
- If a video is selected, the image being displayed as the thumbnail can be used.
| Inapplicable model: HC- | X920 / X929 / X920M V520 / V520M V720 / V727 / V720M / V727M |
| HX- | A1M / A1H / A500 / WA30 / A100 |
Automatically selects the best frames from recorded video and saves them as still pictures.
Using the photo frames, multiple still pictures can also be edited into one image.
- Preparation : Connect smartphone to video camera via Wi-Fi.
- Tap
- Tap [Highlight Photo Collage]

The thumbnail display screen is displayed. - Check the boxes for the videos you want to make pictures of
- You can select up to 16 videos.
- Tap [Execute]
An estimated number of still pictures to be generated is displayed. - Once you have selected a folder to save in and entered a name, tap [Execute]
- If multiple videos are selected, this may take some time.
- Tap
![]() Compile the still pictures edited with Highlight Photo Collage into one photo
Compile the still pictures edited with Highlight Photo Collage into one photo
- Tap [Create a Highlight Photo Collage] while the completion screen of
Highlight Photo Collage is displayed
The still picture you edited will be displayed in one of the photo frames as a sample
- Select still picture and photo frame
- Tap
 if you wish to change photo frame
 - If you wish to change still pictures, please tap the thumbnail of the picture you wish to change. The selected picture's border will be highlighted.
- Tap
 to display thumbnails and reselect.
- Tap
- Tap
 to save the edited photo frame
- Tap [Return] to continue editing.
To conclude editing in photo frame, tap
- Created scenes are stored under [Gallery] in JPEG format.
- Tap [Return] to continue editing.
- Creating and storing scenes may take time.
- Once edited and saved, photo frames cannot be re-edited later.
- iFrame scenes and scenes saved in MP4 are not supported.
| Inapplicable model: HX-A1M / A1H / WA30 |
Automatically extract highlights from recorded scenes, add effects and store them.
- Preparation : Connect smartphone to video camera via Wi-Fi.
- Tap
- Tap
 ([Highlight Playback] or [Highlight])
The thumbnail display screen is displayed.
* When you first use highlight creation, an explanation screen will be displayed. - Add checks to checkboxes of scenes to add effects to:
You can select up to 30 scenes.
- Tap
You can add your preferred still picture as a title image for Highlight.
To add one, please check the box under [Title Settings].
| * Applicable Model : HC- | VX3 / V900 WXF1 / WXF1M / VXF1 / VXF11 / VX1 / VX11/ V800 / V808 WXF995 / WXF995M / VXF995 / VX985 / VX985M / W585 / W585M / V785 / V385 WXF990 / WXF991 / WXF990M / VXF990 / VXF999 / VX980 / VX981 / VX989 / VX980M / W580 / W580M / V380 W850 / W858 / W850M / V750 / V757 / V750M |
| HX- | A500 / A100 |
[Background music (BGM)] *1 / [Audio settings] *2
You can add your own favorite background music to this function.
You can configure a music file (Max. 5 min.) from your smartphone as your user background music.*3
| *1 Applicable Model : HC- | VX3 WXF1 / WXF1M / VXF1 / VXF11 / VX1 / VX11 WXF995 / WXF995M / VXF995 / VX985 / VX985M WXF990 / WXF991 / WXF990M / VXF990 / VXF999 / VX980 / VX981 / VX989 / VX980M WX970 / WX979 / WX970M / VX870 / VX878 / VX870M / V770 / V777 / V770M W850 / W858 / W850M / V750 / V757 / V750M |
| *2 Applicable Model : HC- | V900 / V800 / V808 W585 / W585M / V785 / V385 W580 / W580M / V380 W570 / W570M / V270 |
| HX- | A500 / A100 |
| *3 Applicable Model : HC- | VX3 /V900 WXF1 / WXF1M / VXF1 / VXF11 / VX1 / VX11 / V800 / V808 WXF995 / WXF995M / VXF995 / VX985 / VX985M WXF990 / WXF991 / WXF990M / VXF990 / VXF999 / VX980 / VX981 / VX989 / VX980M WX970 / WX979 / WX970M / VX870 / VX878 / VX870M / V770 / V777 / V770M / W570 / W570M / V270 W850 / W858 / W850M / V750 / V757 / V750M |
| HX- | A500 |
- Created scenes are stored to [Gallery].
- Created scenes are stored as MP4.
- Creating and storing scenes may take time.
- If the selected scenes do not include highlight information, you cannot store highlights.
- iFrame scenes and scenes saved in MP4 are not supported.
- Some music files (such as those that are copyright-protected) may not be usable even if they can be selected depending on the tune or device used.
- Unless you are the copyright holder or you have obtained permission from the copyright holder, please do not upload video or music files protected under copyright.
| Applicable Model : HX- | A1H / A1M / A100 / A500 |
You can configure the protection settings so that videos / still pictures will not be deleted accidentally.
- Preparation : Connect smartphone to video camera via Wi-Fi.
- Start this application and tap
 at bottom of screen
The thumbnail display screen is displayed. - Tap
 on top of screen, and select [SCENE PROTECT]
The settings screen is displayed. - Tap to select the videos / still pictures you want to protect
 will be displayed in the thumbnail that you set. Tap it again to remove the setting.
- Start this application and tap
- Even protected items may be erased if SD card is formatted
| Applicable Model : HX- | A100 / A500 |
| Deleted scenes can't be restored, so please use the delete function after verifying what you are deleting. |
- Preparation : Connect smartphone to video camera via Wi-Fi.
- Start this application and tap at bottom of screen
The thumbnail display screen is displayed. - Tap on top of screen, and select [SPLIT & DELETE]
- Tap the video that you want to split and delete
The settings screen is displayed. - Tap
 to start playback and pause at the position where you wish to create the partition
You can use ,
,  and
and  to adjust the playback position.
 - Tap
 , then select [Front] if you want to delete the portion before the split location, or [Back] if you want to delete the rear portion
The selected scene will be deleted.
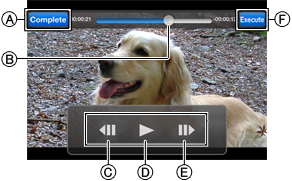
(The illustration is an example.) - Start this application and tap
A |
Return to the previous screen. |
B |
Navigate to where you dragged it. |
C |
Step backward |
D |
Play / Pause |
E |
Step forward |
F |
Execute split and delete. |
- Protected videos can't be split and deleted.
- It may take time to perform the operation depending on the operating environment, and it may not play back normally.
- You may not be able to split short files.