
![]() The Panasonic Audio Connect app is a
The Panasonic Audio Connect app is a
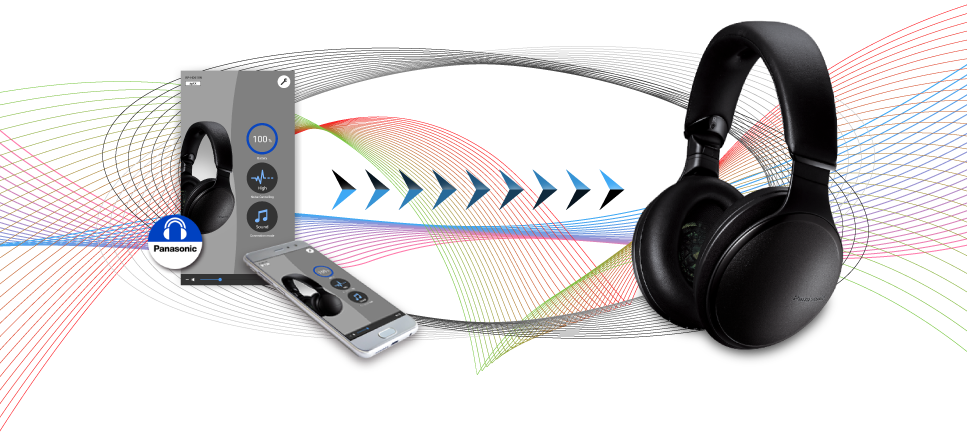
simple and convenient application to help you enjoy music through your headphones.
Panasonic Audio Connect is an app that allows you to enjoy the following kinds of headphone functions.
・ Software updates
・ Customization of various settings
・ Access to the Online manual
- * Google, Android, Google Play, and other related marks and logos are trademarks of Google LLC.
- ・LDAC and LDAC logo are trademarks of Sony Corporation.
- ・The Bluetooth® word mark and logos are registered trademarks owned by Bluetooth SIG, Inc. and any use of such marks by Panasonic Corporation is under license. Other trademarks and trade names are those of their respective owners.
- ・Qualcomm aptX is a product of Qualcomm Technologies, Inc. and/or its subsidiaries.
Qualcomm is a trademark of Qualcomm Incorporated, registered in the United States and other countries. aptX is a trademark of Qualcomm Technologies International, Ltd., registered in the United States and other countries. - *Other system names and product names appearing in this document are in general the registered trademarks or trademarks of the respective developer companies.
Note that the TM mark and ® mark do not appear in this document.
- Terms of Service and Disclaimer
- End User License Agreement (EULA)
Let’s get started
- The app can be used on Android™ handsets running on version 6.0 or later of the operating system.
- Panasonic Audio Connect does not support the Multi-Window functionality found in Android™7.0 or later.
- The screen displays shown below are examples. Actual displays depend on the handset and OS you are using.
Connection with Bluetooth® wireless technology
The license information confirmation screen opens after you start the app.
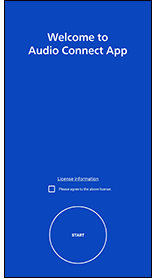
2. Put a check mark in the check box.
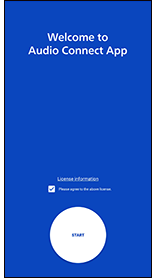
3. Tap “START”
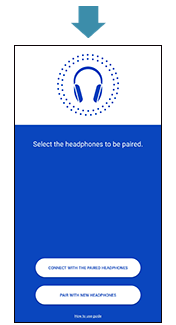
4. Follow the on-screen instructions to connect using Bluetooth® wireless technology
・ If one of the following screens appears:
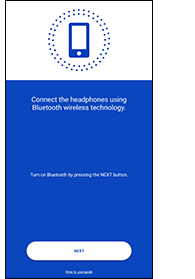
- If Bluetooth® is set to OFF, tap “NEXT” to set it to ON.
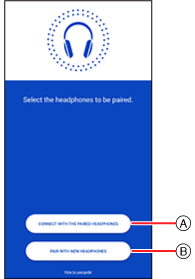
- Tap  to set headphones that have already been connected using Bluetooth® wireless technology on the app.

Tap the headphones you want to connect.
- Tap  to set headphones that have not yet been connected using Bluetooth® wireless technology on the app.
・ Follow the below screens to set.

After connecting using Bluetooth® wireless technology, continue to perform the initial settings for the headphones.
Initial settings
Follow the on-screen instructions to make the following settings. (The settings can also be changed from the “Setting” screen.)
・ “Headphone name”
・ “Body color”
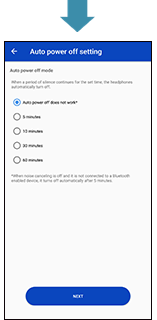
・ “Auto power off setting”
・ “Guidance language setting”

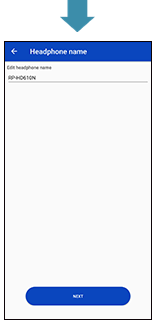
Tap the headphone name to change it.

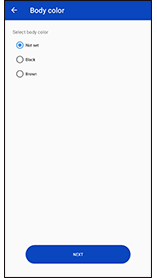
- ・The “Body color” item is shown only when connected to headphones that are able to change the body color. The image of the headphones shown in the “Main screen” changes when you change this setting.
Tap the condition you want to set to change it.
Tap the condition you want to set to change it.
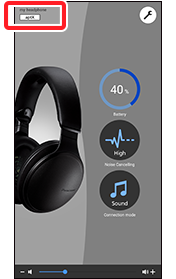
Convenient functions
The main screen
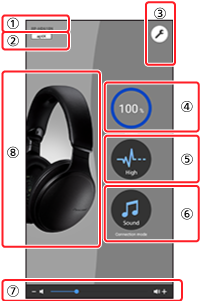
 Headphone name
- ・ This shows the name of the connected headphones.
- ・ You can edit the headphone name in “Setting”.
 Connected codec
- ・ This shows the codec being used to connect the headphones.
| Codec | Indicator |
|---|---|
| SBC | |
| AAC | |
| Qualcomm® aptX™ | |
| Qualcomm® aptX™ HD | |
| LDAC™ | |
| A2DP Not connected |
- ・ The codec used is selected from those codecs that your handset supports, so there may be codecs shown here that are not displayed.
 Setting button
- ・ Tap the setting button to display the “” screen for this app.
 Remaining headphone battery charge indicator
- ・ This shows the charge remaining for the headphones.
 Noise canceling button
- ・ Tap the noise canceling button to change the noise canceling mode settings.
- ・ Each time you touch the button, the mode changes in the order “High” > “Medium” > “Low” > “Off”.
| Function | Indicator |
|---|---|
| Noise canceling mode strong <High> |
|
| Noise canceling mode medium <Medium> |
|
| Noise canceling mode weak <Low> |
|
| Noise canceling mode <Off> |
・ The settings can also be changed in “” in the setting screen.
 Connection mode button
- ・ Set whether to use a connection between the handset and the headphones that prioritizes sound quality or one that prioritizes connectivity.
- ・ The mode switches between “Prioritize sound quality” and “Prioritize connectivity” each time you touch the connection mode button.
| Function | Indicator |
|---|---|
| Prioritize sound quality | |
| Prioritize connectivity |
・ The settings can also be changed in “” in the setting screen.
- ・ When the device is connected to the headphones using SBC while the prioritize sound quality mode is enabled, the setting cannot be changed.
- ・ Playback stops while the connection mode is being changed.
 Volume bar
- ・ This is linked to the volume of the media on the smartphone.
- ・ You can adjust the volume by dragging the slider.
 Headphone image display
- ・ This shows an image of the connected headphones.
- ・ You can change the color of the headphones in “Body color” in “” in the setting screen. (The setting item is shown only when connected to headphones that are able to change the body color.)
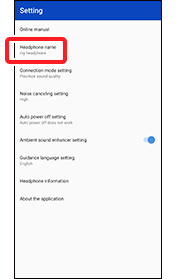
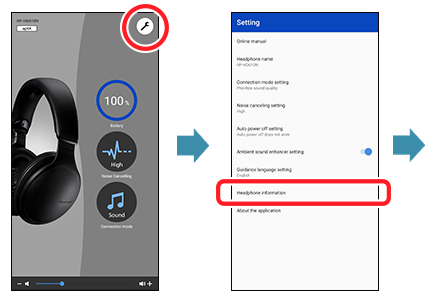
Settings
You can change a variety of settings for the headphones and this app in the setting screen.
(The items you can set depend on the connected model.)

Tap the setting button to display the setting screen.
Tap the item you want to set.
Online manual
This shows the web page with the operating instructions for the connected headphones.
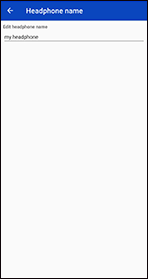
Headphone name
Change the “” displayed in the main screen, etc.
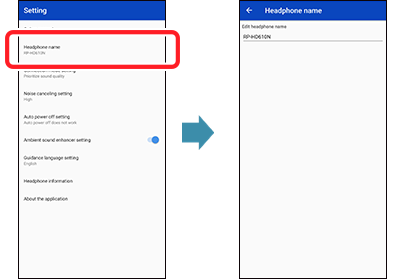
The headphone name in the following screens is changed.
Headphone name screen, setting screen, main screen, screen showing a list of connected headphones, notification screen
(Screens other than the above are not changed)
Example: When the headphone name is changed to “my headphone”
Connection mode setting
Set whether to use a connection between the handset and the headphones that prioritizes sound quality or one that prioritizes connectivity.
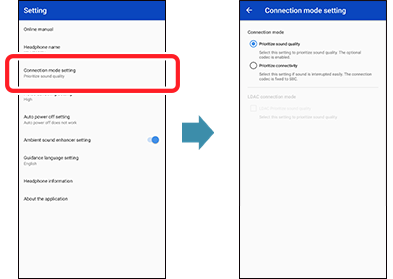
- ・ When the device is connected to the headphones using SBC while the prioritize sound quality mode is enabled, the setting cannot be changed.
- ・ Playback stops while the connection mode is being changed.
- ・ On Android 10, the check box of LDAC Prioritize sound quality may not work depending on the device you are using.
Noise canceling setting
You can change the noise canceling mode setting.

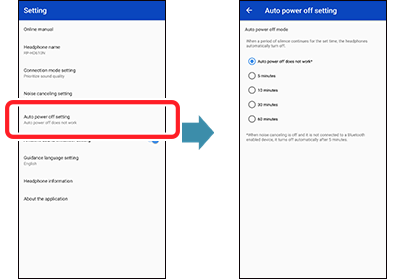
Auto power off setting
When a period of silence continues for the set time, the headphones automatically turn off.
Ambient sound enhancer setting
The ambient sound enhancer function makes it easier to listen to sounds around you, such as announcements on trains, when you want to, without taking the headphones off.
Set whether to enable the ambient sound enhancer function.
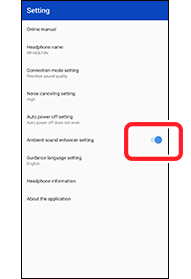
Use the switch to change the setting.
・The ambient sound enhancer function is enabled when the switch is set to ON.
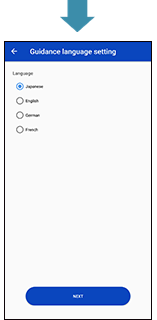
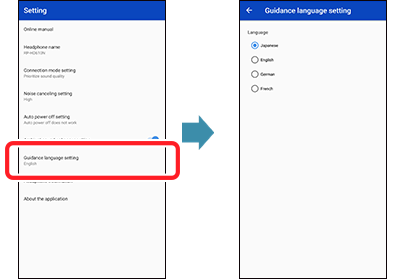
Guidance language setting
Switch the language used for audio guidance on the headphones.
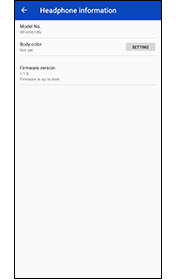
Headphone information
You can view product information about the headphones.
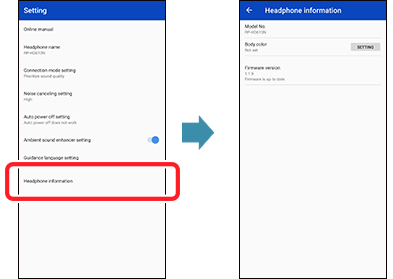
- ・ The “Body color” item is shown only when connected to headphones that are able to change the body color. The image of the headphones shown in the “” changes when you change this setting.
- ・ You can view the current version of the firmware used in the headphones in “Firmware version”. If the latest version of the firmware is detected, tap “UPDATE”.
About the application
You can view information about this app.

- ・ License information is shown if you tap “License information”.
- ・ Tap “How to use guide” to show the How to use guide (this guide).
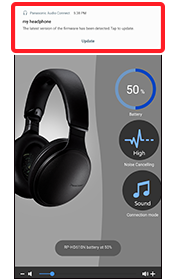
Updating the firmware
You can use this app to update the firmware of the connected headphones.
- ・Follow the procedure below to view the firmware version of the headphones and update if the latest version has been detected.
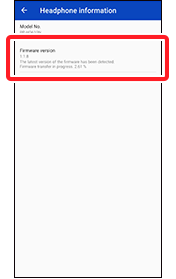
When the latest version of the firmware is detected, the firmware transfer to the headphones is started automatically. You can continue to use the headphones during the transfer.
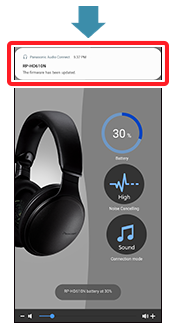
- ・A notification is displayed when the transfer is completed. The firmware update starts when you tap “Update”.
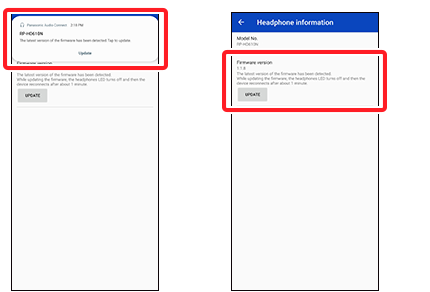
The firmware update starts when you tap “UPDATE”.
Do not operate the headphones or the app. Wait until the notification indicating that the update is finished is displayed.
* After updating the firmware, the headphones automatically restart and reconnect with the handset.
Until a notification is displayed after completion of the update, the app will not work properly even if you try to operate it, so do not try to operate the headphones or the app.
If “Firmware is up to date.” is displayed in “Setting” > “Headphone information”, the firmware has been update to the latest version.
Frequently asked questions
- Q01. With what kind of devices can I use Panasonic Audio Connect?
-
RP-HD610N (as of February 2019)
- Q02. Which Android™ devices can run Panasonic Audio Connect?
-
Android™ handsets running on Android™ 6.0 or later as their operating system.
However, this is not a guarantee that the app will operate on all Android™ handsets running on these operating systems. - Q03. What languages are supported?
-
Japanese, English, French, German, and Canadian French. The language changes automatically to match the language set on the handset. If the set language is one other than Japanese, English, French, German, or Canadian French, the displays will be in English.
- Q04. How do I cancel pairing with the headphones?
-
You cannot cancel pairing from this app.
To cancel pairing, cancel registration of the headphones in the Bluetooth® settings screen on the handset. - Q05. Cannot connect to the headphones.
-
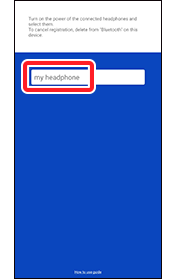
・When pairing with new headphones or when the headphones are not ready for pairing, press and hold the power button on the headphones to make them ready for pairing (blinking red and blue).
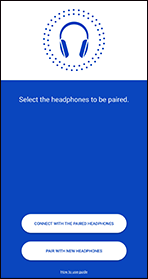
・If you are unable to connect with paired headphones, turn on the power of the headphones. If the following screen is displayed, after tapping “CONNECT WITH THE PAIRED HEADPHONES”, tap the button for the headphones you want to connect.
・If the handset is in airplane mode, turn off airplane mode. If you turn off airplane mode and Bluetooth® stays off, turn Bluetooth® on.
・It may be possible to connect by moving the handset and headphones closer together or by turning off other Bluetooth® wireless technology enabled devices.
・If connection is not possible even after doing the above, perform the steps below to pair the headphones and handset again.
- Close all apps that are running in the background.
- First delete the registration information for the headphones in the Bluetooth® settings on the handset.
- Turn Bluetooth® on the handset off, then turn it on again.
- Return the headphones to the factory default settings. Refer to the operating instructions of the headphones for details.
- Start the Panasonic Audio Connect app and pair the headphones again according to the on-screen instructions.
・Depending on the handset you are using, you may not be able to connect using the Panasonic Audio Connect app. If this is the case, try pairing using the connection notification shown at the top of the handset’s screen or through the Bluetooth® settings on the handset.
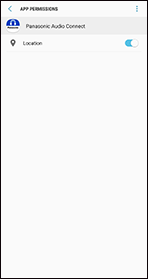
After setting up pairing, press the home key, and then tap the Panasonic Audio Connect app.・If permission for the Panasonic Audio Connect app to access location information is turned off on the handset, turn it on.
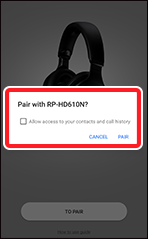
・Depending on the handset, the following pairing setting screen may be displayed.
After tapping “Pair”, follow the pairing settings screen to make the pairing settings.
Display example: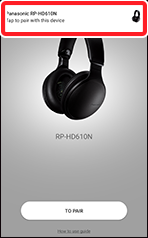
・If you are searching in the following screen but the headphones are not detected and the previous screen is displayed:
After pairing with the headphones using the Bluetooth® settings on the handset, start the app.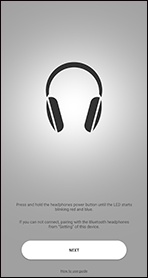

- Q06. Cannot update the firmware.
-
・Connect the handset to the Internet.
・When looking at the firmware version in “Setting” > “Headphone information” on the app, transfer of the firmware to the headphones does not start.
If transfer of the firmware update does not start, or if the figures freeze and do not proceed during an transfer
[Method 1]
- Turn the headphones off and then on again.
- Once the headphones connect with the app, on the app tap “Setting” > “Headphone information”.
[Method 2]
- Kill the tasks on the app.
- Restart the app.
・The firmware update notification is not displayed.
Turn on “Settings” > “Apps & Notifications” > “Panasonic Audio Connect” > “Show notification” > “Update” to permit access to the update notification.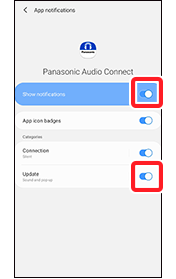
If this is turned off, information regarding firmware updates will not be displayed, so set it to on.
・Connection notifications are not displayed in versions earlier than Android8.
・If updating of the firmware failed, then the process may start from transferring the next detected firmware.
- Q07. “Firmware update failed.” is displayed in the Headphone product information.
-
Turn the headphones off then on again. Depending on the status of the headphones when the error was detected, perform one of the following operations to recover from the error.
1) When transfer is restarted in the headphone product information screen, press the update button that is displayed when the transfer is completed.
2) When the update button is displayed in the headphone product information screen, press the update button.
3) When “Firmware is up to date.” is displayed in the headphone product information screen, the most up to date firmware has been restored, so no further action is required.
- Q08. The characters on the screen are cut off and cannot be read.
-
Adjust the font size in the following menu on the handset.
・ “Display” > “Advanced” > “Font size”
・ “Display” > “Advanced” > “Display size”
The setting menu on the headset may have different menu names or levels depending on the version of the OS.
- Q09. A particular codec is not displayed in the connected codec display.
-
The codec used is selected from those codecs that your handset supports, so there may be codecs shown here that are not displayed.
Refer to the manufacturer of your handset or your carrier for the codecs supported by your handset.