| STEP 2. Download the updated version of the firmware with the following procedures, and self-extract it. |
- Make a temporary folder on your PC for downloading the file,e.g. C:/Temp.
- Download and save the firmware in the folder you created in the above step.
| TZ4_V12.exe / 1,918,680 Bytes |
TZ5_V12.exe / 1,973,119 Bytes |
 |
 |
- Double click the downloaded file
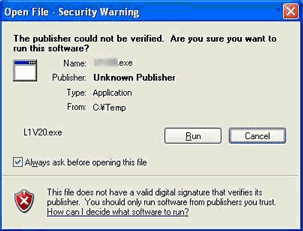
You may see following screen after you have double clicked the downloaded file, please ignore it and just click "Run" button and move to the next step.
- The self-extracted file TZ4_a.bin or TZ5_a.bin will appear.
The file size for TZ4_a.bin and TZ5_a.bin should be 5,030,946 Bytes.
If the file size is not the same, please download and double click the file again. The file size can be checked by right-clicking on the file and selecting properties.
- Make a temporary folder on your Mac for downloading the file.
- Download and save the firmware in the folder you made in the above step.
| TZ4_V12.zip / 1,943,290 Bytes |
TZ5_V12.zip / 2,000,270 Bytes |
 |
 |
- Extract downloaded file
- Depending on your Macintosh setting the file maybe automatically extracted.
- If your OS is earlier than Mac OS X 10.3, please use Extract software. If your Macintosh OS is equal or later than Mac OS X 10.3, double click the file, TZ4V12.zip or TZ5V12.zip.
- The extracted file TZ4_a.bin and TZ5_a.bin should be 5,030,946 bytes if the file size is not the same, please download and double click the file again. To check the file size, view “File in FinderE then check the information window.
|
| STEP 3. Copy the firmware file onto an SD Memory Card. Prepare an SD Memory Card with the extracted file from STEP 2 above. |
|
Preparation of the SD Memory Card
8 MB or more must be free on the SD Memory Card and use an SD Memory Card which has already been formatted for the DMC-TZ4/TZ5.
Please refer to the SD Memory Card formatting information, How to format an SD Memory Card.
Copying the downloaded file onto the SD Memory Card
Note:
If your PC does not have an SD slot, use an USB SD Reader/Writer.
Copy the file into the Root directory (*1) of the SD Memory Card.
(*1) Root directory = The first or top-most directory in the hierarchy.
Files can be directly copied from the PC by using SD Reader/writer devices with the USB port.
Use DMC-TZ5,DMC-TZ4 for formatting the SD Memory Card in such cases.
When formatting the SD Memory Card, all data, including protected data, will be erased and can not be recovered. Please make sure to back up your important data so you don't loose it.
|
| STEP 4. Install the firmware update |
- Charge the battery fully.
- Make sure to turn off the power switch.
- Insert the fully charged battery to the body.
If the battery is not full, the Fig.3 will not appear.

- Insert the SD Memory Card prepared in STEP 3 into the DMC-TZ4/TZ5.
- Set Playback/Recording switch to playback mode.
- Turn on the power switch.
- After the message of "PLEASE WAIT ..." is displayed, the following display will continuously be shown on the LCD (Fig.3).
 |
Version number varies according to the updated firmware used. |
| <Fig. 3 The initial setup of the firmware updating process> |
If newer version or same version of firmware has already been installed, the initial setup screen(Fig. 3) will not be displayed. And the DMC-TZ4/5 will display that "NO VALID PICTURE TO PLAY". Please turn off your camera and use the camera as is. About SD Memory Card, please refer to the Note below.
- Press the Up button to select YES. The update process will start (Fig. 4 and Fig. 5).
 |
| <Fig. 4 To start the update, select YES.> |
 |
| <Fig.5 Location of MENU/SET and cursor buttons.> |
- At the above screen(Fig.4), press the MENU/SET button(Fig.5) and the screen will change to Fig. 6.
The DMC-TZ4/TZ5 will start the update process.
The firmware update will take about 1 to 2 minutes.
Please do not attempt the following operations before completion of next step 10.
- * Turning the power off and on
- * Opening the SD Memory Card compartment
- * Removing the SD Memory Card
|
 |
|
| <Fig.6 Version up on Going> |
- Once the firmware update process is completed, the DMC-TZ4/TZ5 will turn off the power and turn on again then the camera will be reset to initial mode automatically.
- To verify the version number, follow Step1 at the beginning, the camera version number indicates 1.2, the process is completed.
- Turn off the power switch.
- Remove the SD Memory Card.
Note:
About the SD Memory Card after it has been used for a firmware update.
Please format the SD Memory Card used for the firmware update before taking photos, otherwise it may cause the DMC-TZ4/5 to malfunction and/or decrease the number of pictures that can be taken.
|


