
FAQ
-
EAH-AZ70W, EAH-AZ60, EAH-AZ-40 (As of September 2021)
This guide provides instructions for EAH-AZ60 and EAH-AZ40. -
Handsets running on iOS 12 or later as their operating system.
However, the app may not operate correctly depending on the version of the operating system. -
The display of the app supports Japanese, English, French, German, Spanish, Canadian French, Italian, Polish, and Russian. The language switches automatically to match the language setting of the smartphone. The displays are in English if the language setting is not Japanese, English, French, German, Spanish, Canadian French, Italian, Polish, or Russian.
-
You cannot cancel pairing from this app.
To cancel pairing, cancel registration of the headphones in the Bluetooth® settings screen on the handset. -
- When paring new headphones or when the headphones are not in the pairing mode, put the headphones in the pairing mode. Tap "Setting" > "Add headphones", and follow the on-screen instructions to operate.
- If you cannot connect with paired headphones, turn the headphones on.
- If the handset is in airplane mode, turn off airplane mode. If you turn off airplane mode and Bluetooth® stays off, turn Bluetooth® on.
- If the Bluetooth® setting on the handset is off, turn it on.
- It may be possible to connect by moving the handset and headphones closer together or by turning off other Bluetooth® wireless technology enabled devices.
- If connection is not possible even after doing the above, perform the steps below to pair the headphones and handset again.
- 1. Close all apps that are running in the background.
- 2. In the Bluetooth® settings, delete "(MODEL NUMBER)" and "LE-(MODEL NUMBER)" registered in "My devices". (After tapping the i mark, tap "Remove device")
- 3. Return the headphones to the factory default settings. Refer to the operating instructions of the headphones for details.
- 4. Turn Bluetooth® off, then turn it on again.
- 5. Put the headphones in pairing mode.
- 6. Tap the "(MODEL NUMBER)" detected in "Devices" in the Bluetooth® screen.
- 7. When "(MODEL NUMBER)" is connected, start the Technics Audio Connect app then follow the on-screen instructions to operate the headphones and the handset.
- Under iOS13 or later, the following dialog is displayed when you start the app for the first time.
If [Don’t Allow] was selected, perform the following procedure.
- 1.On the device in Settings > Privacy > Bluetooth > Audio Connect, set Audio Connect to ON.
- 2.Start the app.
-
- Connect the handset to the Internet.
- Check the firmware version in “Setting” > “Headphone information” on the app. If the transfer of the firmware to the headphones does not start, or if the numbers stop and do not progress while transferring
- 1. Confirm that the remaining battery charge for both earphones (L and R) is 70% or more.
- 2. Keep the headphones out of the charging cradle between the start of the transfer/update up until they finish.
- 3. Do not use the smartphone to make calls or play back music between the start of the transfer/update up until they finish.
-
1. Do a forced restart of the app.
-
2. Restart the app.
- The firmware update notification is not displayed.
On the handset, turn on "Apps & notifications" > "App info" > "Technics Audio Connect" > "Notifications" > "Update" to permit access to the notifications.
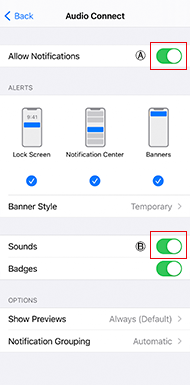
 Switch on
 Switch off to turn off the sound when there are update notifications.
*If you restart your device, update notifications may not be displayed.
Start the app and follow the procedure below to check.
“Main screen” > “Setting button ” > “Headphone information”
・If updating of the firmware failed, then the process may start from transferring the next detected firmware.Adjust the font size in the following menu on the handset.- “Settings” > “Display & Brightness” > “Text Size”
- “Settings” > “Display & Brightness” > “View”
The setting menu on the headset may have different menu names or levels depending on the version of the OS.The codec used is selected from those codecs that your handset supports, so there may be codecs shown here that are not displayed.Refer to the manufacturer of your handset or your carrier for the codecs supported by your handset.It is not possible for settings to be changed on this app for connected headphones other than the headphones recognized by this app. Use after confirming in the settings screen of the handset that one set of headphones only is connected.Headphones that have been connected are managed by the app.To remove from the list, initialize the app in "Setting"> "About the application"> "Initialize app".Normal operations to take phone calls are supported, but operations for messaging apps that use the Internet are not supported.*There are some smartphones on which functionality for taking calls is not supported.To turn on the power from auto power off, touch and hold the touch sensor until the earphone LEDs (blue) light. (Approximately 2 seconds)
The beep sounds about 3 seconds after the LED (blue) lights and the power turns on.
If the power does not turn on, put the earphones into the charging cradle and charge them.The rate may differ depending on the signal status and usage status.The app manages the "Headphone name" of headphones that have been connected and also the language settings for the Voice prompt and Amazon Alexa.
Even if the factory settings are restored on the headphones, settings managed on the app are not initialized.In situations other than when a phone call is being received, you can request that the connected smartphone, or other handset change the volume using the operations to change the volume with the headphones, but the volume may not change depending on the connected handset.
Take care when touching the headphones to change the volume while in a call as this may cause noise that can disturb the other party in your call.Turn on the [Bluetooth] setting in the "Settings" screen of the smartphone.
Apart from the setting above, there may be cases when you are temporarily able to turn Bluetooth on or off in the control center.
Confirm that the "Bluetooth" setting is on in the "Settings" screen and that "Bluetooth" is on in the control center.
When using iOS13 or later, on the handset, also turn on "Settings" > "Technics Audio Connect" > "Bluetooth".When putting the earphones down on a desk, etc., the touch sensors may register a touch depending on the desk material.
To prevent erroneous operation, take care not to touch the touch sensors on the desk, etc., when putting the earphones down.When both earphones are taken out, if the LED of one of the earphones lights blue and this continues for 3 or more seconds, initialize the other earphone and re-pair it with the Bluetooth® device.If the pairing (registering) with the smartphone is complete, you can use just the side (L or R) that you take out of the charging cradle. If you use L and R with separate smartphones, they will each remember which smartphone they were last used with, so when you want to use both with one smartphone again, you need to first disconnect the Bluetooth® connection with the smartphone you will not be using.