SNS
Preparation
- Wi-Fi connection
Operation
1. Tap
The thumbnail display screen is displayed.
2. Tap and hold the image, and drag it to save
When tapped, images are enlarged.
You can assign functions on the edges to wherever you prefer.
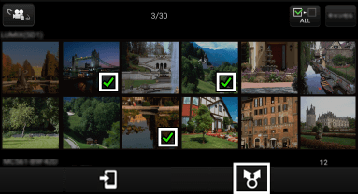
- Sharing multiple images
Tap [Select] at the top of Multi Playback screen and check several images for multiple selection.
On this screen, tap![]() at the bottom of the screen to select the social network to transfer to from the displayed list.
at the bottom of the screen to select the social network to transfer to from the displayed list.
(The illustration is an example.)
Setting LUMIX CLUB*
* By uploading images to our website LUMIX CLUB, you can download them to Panasonic AV equipment in your home or elsewhere, and you can also submit them to sharing services on websites run by other companies.
1. Tap menu
2. Tap [Playback settings] > [LUMIX CLUB settings]
3. Activate [Start LUMIX CLUB function use]
- You need to log in with your ID. Tap [Sign up] and follow registration instructions to get a login ID.
Tap menu![]() > [Playback settings] > [“Picture Share” settings] and drag icons on screen to tabs displayed at top, bottom, left and right of screen to set tabs as forward destinations.
> [Playback settings] > [“Picture Share” settings] and drag icons on screen to tabs displayed at top, bottom, left and right of screen to set tabs as forward destinations.
(For Android devices)
Drag desired icon of SNS installed in your smartphone / tablet from setting screen to tab.
(For iOS devices)
SNS icons will show on setting screen. Drag desired SNS icon to tab and follow setting instructions. *You need to log in with your ID.
Tap [Sign up] and follow registration instructions to get a login ID.
* Uploading to SNS mentioned above, you need to log in with your LUMIX CLUB ID.