Basic Operations for Recording
Preparation
- Wi-Fi connection
Operation
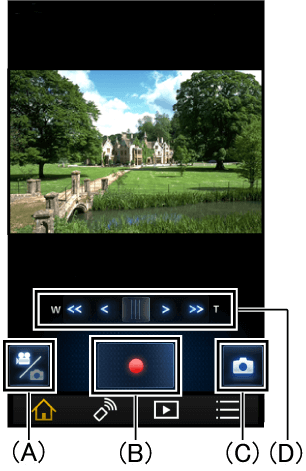
| (A) | Switch between still picture / video |
| (B) | Recording a video |
| (C) | Taking a still picture |
| (D) | Zoom W (Wide) to widenT (telephoto) to magnify |
Recording Settings
The recording settings/recording mode below are only a part of those introduced.
Please refer “Menu![]() ” for others.
” for others.
- Use the slow zoom function*
Records video that zooms at a slower speed than normal zoom.
* Compatible models: HC-WXF995 / WXF995M / VXF995 / VX985 / VX985M
Preparation
- Wi-Fi connection
- Tap
 to set your smartphone to video recording mode.
Operation
- Tap menu

- Tap [Record Setup] > [Recording Mode] > [Slow Zoom]
- Tap
 to record a video
 - Tap
 or
or to start slow zoom
- To stop zooming, tap the button you tapped in Step 4 once again.
- Tap
 to change the zoom speed.
- Add a marker to interesting scenes while recording
Tap![]() to add a marker while recording 4K video or 4K PHOTO.*
to add a marker while recording 4K video or 4K PHOTO.*
You can check pictures with markers on the camcorder itself.
* Compatible models: HC-WXF995 / WXF995M / VXF995 / VX985 / VX985M
- Using the Stop Motion Animation Assist Functions
By slightly moving the subject between shots, you can create stop-motion slideshows.
Preparation
- Wi-Fi connection
- Tapto set your smartphone to still picture recording mode.
In video recording mode, [Stop Motion Animation Assist] is not available.
Operation
- Tap menu
- Tap [Record Setup] > [Recording Mode] > [Stop Motion]
- Tap
 to record a still picture
When saving, please tap [Save].
Tap [Cancel] when you want to retake the photograph.- A still picture will be saved, and the captured still picture will be shown as a semi-transparent copy on the recording screen. Use this as a guide for how much to move it.
When still pictures are saved in a photograph group, the last picture will be displayed as a semi-transparent copy on the recording screen.
- A still picture will be saved, and the captured still picture will be shown as a semi-transparent copy on the recording screen. Use this as a guide for how much to move it.
- Move the subject and taking the next composition
Repeat steps 3 and 4 to take pictures.
- Until executing the [Create Stop Motion], you can record still pictures in the same photograph group.
One photograph group can have a maximum of 999 still pictures recorded.
- Until executing the [Create Stop Motion], you can record still pictures in the same photograph group.
- Creating a new recording group
To capture a new Stop Motion group, please tap Menu![]() , then tap [Record Setup] > [Create Stop Motion].
, then tap [Record Setup] > [Create Stop Motion].
- Notes
- [Picture Size] is set to (1920×1080).
- If you want to make more than one stop motion animation at a time, insert a different SD card before recording still pictures of a different stop motion animation to record them in a separate recording group.
Twin Camera
Using the Sub Camera and the Main Camera, you can record two images simultaneously. (Sub Window)*
Use the Sub Camera to enjoy recording yourself, a family member next to you or scenery different from that seen from the Main Camera.
* Compatible models: HC-WXF995 / WXF995M / W585 / W585M
!
- Recording only with the Sub Camera is not possible.
- Images recorded with the Main Camera and the Sub Camera will be recorded as a single scene or still picture. When you play them back, you cannot delete just the image recorded with the Sub Camera or hide it.
- The minimum focus distance of the Sub Camera is approximately 30 cm.
Preparation
- Wi-Fi connection
- Rotate the Sub Camera
Operation
- Record still pictures/video
Set
| [Sub Window] |
|---|
| Sets Twin Camera to ON/OFF. |
| [Sub Window Position] |
| Changes Sub Window position while recording. |
| [Sub Window WB] |
| Sets Sub Window white balance. |
| [Sub Window Brightness] |
| Sets Sub Window brightness. |
| [Sub window frame] |
| Changes the color of the sub window frame. |
| [Sub window zoom]* |
| Changes the zoom magnification of the sub window. |
| [Narration Mode] |
| Set for clear recording of the photographer's voice. |
* Compatible models: HC-WXF995 / WXF995M
- Notes
- If this application is launched and set to recording mode with the Sub Camera's lens rotated, it will automatically be set to Sub Window mode.
- Depending on the recording conditions, the color balance and brightness of the images from the Main Camera and the Sub Camera may vary.
Wireless Twin Camera
Set to use a smartphone camera as a Sub Camera, and record both main camera and Wireless Sub Camera images to the video camera simultaneously.
!
- The images recorded with the main camera and the Wireless Sub Camera will be recorded as a single scene/still picture. During playback, it is not possible to delete or hide only images taken with the Wireless Sub Camera.
Preparation
- Press video camera Wi-Fi Button
- Touch
 (
( if using multiple smartphones as sub cameras) >
  on the video camera's LCD monitor
Operation
- Recording a video*1
The actions below can be carried out while using this function.
(Icons will display when screen is tapped.)
| *2 | Switch camera | ||
|---|---|---|---|
| *3 | White Balance | ||
| *3 | Exposure | ||
| *3 | Zoom | ||
*1 When using a Wireless Sub Camera, you cannot record images using this application.
Please start/pause recording using the video camera itself.
*2 Compatible device: Devices with rear/front cameras
*3 Compatible device: Android devices (May not be usable depending on the device.)
Remote Pan Tilt Cradle Remote Operation
By connecting the video camera to the Remote Pan Tilt Cradle VW-CTR1 via a USB cable, you can automatically track the subject’s movements horizontally and vertically during recording, and zoom when necessary.
Preparation
- Attach the Remote Pan Tilt Cradle to the video camera
- Connect the Remote Pan Tilt Cradle and the video camera with the USB cable (supplied with the video camera)
- Press the power button for the Remote Pan Tilt Cradle to turn it on
- Turn on the video camera's power and touch [Remote Pan Tilt Cradle] on the video camera's LCD monitor
- Please prepare your video camera and smartphone by connecting to Wi-Fi
The Remote Pan Tilt Cradle is compatible with camera functions for Remote control recording.
Refer to the video camera user's manual for the connection method for the camera functions.
!
- This function is not designed for anti-theft.
Operation
- Select mode
- Tap the menu, and tap [Pan Tilt Settings] > [Mode]
- Tap the menu
- Use selected mode
Manual

(A) Adjust [Panning Angle] and [Tilt Angle]*1*2 (B) Zoom*1*2*3 (C) (A) and (B) display ON/OFF (D) Recording a video*1*2*3 (E) Taking a still picture*1*2
- Record
- Control Remote Pan Tilt Cradle
Preset Positions
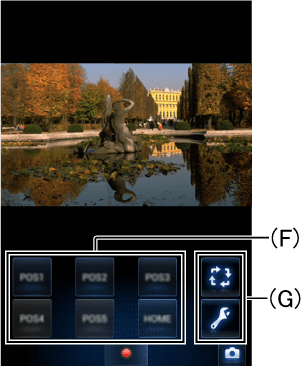
(F) Select position/Cycling order, start operations, etc.*2*4 (G) Set (F), reset, operation selection, etc.*2*4
- Registering positions
Tap
 in (G) and select the position you wish to register for (F).
Once you have adjusted the (A) or (A) and (B) positions, tap in (G).
 - Moving the Remote Pan Tilt Cradle to a registered position
Tap the position registered in (G) above and movement will begin.
Tap during movement to pause the operation.
 - Using Cycle Mode
After
in (G), tap in (F) to access the screen for registering a cycling order. Please register a cycling order.
Tap in (G) and cycling will begin.
If you tap in (F), registration will not be carried out. Moves to the next position when cycling.
Party Scene / Moving Object
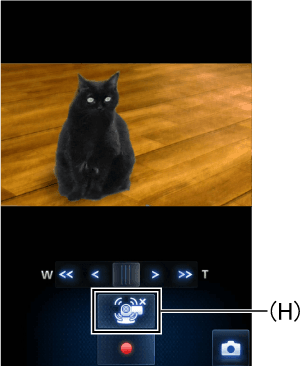
(H) Start/Pause operation*3
- Change movement settings during auto mode
Tap the menu
and then [Pan Tilt Settings] > [Mode] > [Setup] to set your preferred [Panning angle]/[Tilt Angle]/[Tilt Speed]. - Use selected mode
Operation will begin when you tap (H).
Tap
 to start Party Scene, and
 to pause.
Tap to start Moving Object, and
 to pause.
- End Remote Pan Tilt Cradle operation
(For Android devices)
Please tap the Return button on the device in use.
(For iOS devices)
Please tap![]() on the screen.
on the screen.
Set
| [Mode]*1*2*3 | ||
|---|---|---|
| [Party Scene] | : | Records with priority given to portraits in party and similar scenes. |
| [Moving Object] | : | Tracks and records a moving subject. |
| [Manual] | : | Manually operates the Remote Pan Tilt Cradle. |
| [Preset Positions] | : | Register a recording operation and begin recording automatically. |
| [Panning angle]*2 | ||
| [± 180°] | : | Pans to the left/right up to about 180°. |
| [± 90°] | : | Pans to the left/right up to about 90°. |
| [± 45°] | : | Pans to the left/right up to about 45°. |
| [Stationary] | : | Panning to the left/right is off. |
| [Tilt Angle]*2 | ||
| [± 15°] | : | Tilts up/down up to about 15°. |
| [Stationary] | : | Tilting up/down is off. |
| [Tilt Speed]*1*2*3 | ||
| [High] | : | Adjusts the up and down speed of the Remote Pan Tilt Cradle. |
| [Normal] | ||
| [Pan/Tilt check]*3 | ||
You can confirm the operating range of the Remote Pan Tilt Cradle.
| ||
*1 [Manual]
*2 [Preset Positions]
*3 [Party Scene] / [Moving Object]
*4 Display will vary between registration and when operating.
- Notes
- When a Remote Pan Tilt Cradle is used, the sounds of it moving will also be recorded.
- In [Party Scene] and [Moving Object], the subject may not be recorded automatically depending on its size, speed, and the brightness of its surroundings.
We recommend you test film briefly beforehand to confirm video and audio are recording properly. - The Remote Pan Tilt Cradle cannot zoom while moving.
- You cannot pause the Remote Pan Tilt Cradle while it is recording.
When you wish to pause the Remote Pan Tilt Cradle, first stop recording.