Basic Operations for Recording
Preparation
- Connect to a camera via Wi-Fi or Bluetooth
- Tap the
 to display the recording screen
Operation
|
: | Taking a still picture When Burst mode has been set, tap |
|---|---|---|
|
: | Recording a video Video recording is started. Tap again to stop recording video. |
|
: | Switch between the normal screen and full-screen mode (landscape orientation). |
| : | Zoom (If zooming by remote operation possible, it will be displayed. (Not displayed during full-screen mode.) |
Recording settings
If you tap a displayed icon, you can change its settings.
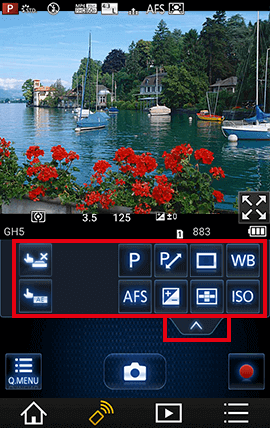
Tap ![]() or
or ![]() to display the icons. (If tapped again, the previous screen returns.)
to display the icons. (If tapped again, the previous screen returns.)
| Simply touch the subject you want to focus on, and it will automatically focus and release the shutter. | ||
| You can easily optimize the brightness in the position that you touched. | ||
| *1 *2 |
Set the recording mode. | |
| *1 *2 |
Set the focus mode. | |
| *1 | Set the Aperture, Shutter Speed, and Program Shift, etc. | |
| Compensation will be made if you cannot obtain proper exposure, such as when there is a great difference between the brightness of the subject and the background. | ||
| *1 | Sets the drive mode. | |
| You can select the focus method depending on the position and number of the subjects. | ||
| Adjust White Balance. | ||
| *1 |
Set Sensitivity/Gain (sensitivity to light). |
*1 The icon display will change depending on the digital camera's settings.
*2 It can be used when [Priority of Remote Device] is set to smartphone on the digital camera.
Tap![]() to display information (settings etc.) on the top and bottom of the recording screen. You can cancel the displayed information by tapping again.
to display information (settings etc.) on the top and bottom of the recording screen. You can cancel the displayed information by tapping again.
Tap![]() to display other recording settings and to perform settings such as [Post Focus].
to display other recording settings and to perform settings such as [Post Focus].
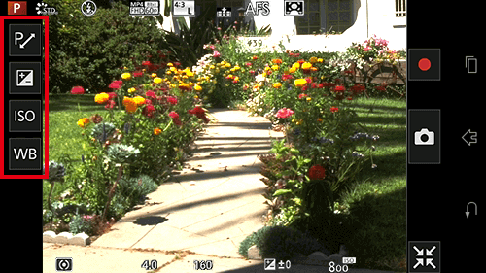
| *1 | Set the Aperture, Shutter Speed, and Program Shift, etc. | |
|---|---|---|
| Compensation will be made if you cannot obtain proper exposure, such as when there is a great difference between the brightness of the subject and the background. | ||
| Adjust White Balance. | ||
| *1 |
Set Sensitivity/Gain (sensitivity to light). |
*1 The icon display will change depending on the digital camera's settings.
- Notes
- The displayed contents are some of the settings that can be changed on the digital camera.
Depending on the recording mode or settings, the contents displayed may vary.
The method of operation may also differ from the digital camera. - After changing settings, the quality of the image displayed on your smartphone can differ from the image displayed on your digital camera. It is recommended that you check image quality using the playback screen on your digital camera.
Recording 6K/4K Photos
With 6K Photo, you can take a high-speed burst of pictures at 30 frames/second and save the desired pictures, each made up of 18 million pixels (approx.), extracted from their burst file.
With 4K Photo, you can take a high-speed burst of pictures at 30 frames, 60 frames/second and save the desired pictures, each made up of 8 million pixels (approx.).
(If the [Priority of Remote Device] is set on the [Camera])
- Set the drive mode dial of the digital camera to [
 ]
] - Tap on
 and select [Picture Size / Burst Speed]
 - Select recording method by tapping
 on the application recording settings screen
 - Taking still pictures
- Tap method and number of shots for each
 differs depending on the recording setting.
- Tap method and number of shots for each
(If [Priority of Remote Device] is set on the smartphone)
- Change recording settings to [6K/4K PHOTO] by tapping
 on the application recording settings screen
- The displayed icon may differ depending on the recording settings.
- Tap
 and then select recording method
- Taking still pictures
- Tap method and number of shots for eachdiffers depending on the recording setting.
- Tap method and number of shots for each
- Recording method
| Item | Tap method or number of taps | Recording is performed |
|---|---|---|
| 6K/4K Burst | Long tap | While tapping |
| 6K/4K Burst(S/S) | 2 times (Start/end shooting) |
From the start to the end of shooting |
| 6K/4K Pre-Burst | 1 time | Approximately 1 second before and after tapping |
Recording using [Post Focus]
(If the [Priority of Remote Device] is set on the [Camera])
- Set the drive mode dial of the digital camera to [
 ]
] - Taking still pictures
(If [Priority of Remote Device] is set on the smartphone)
- Change recording settings to [Post Focus] by tappingon the application recording settings screen
- The displayed icon may differ depending on the recording settings.
- Taking still pictures
Recording pans with little vibration or recording videos with zoom (4K Live Cropping)
You can pan while recording subjects without horizontal shaking of the camera, and you can zoom in and out during video recording without using zoom. During recording, you can crop your video down from the 4K angle of view (3840×2160) to Full High Vision (1920×1080) by capturing the subject at a wide angle of view and setting a crop start frame and crop end frame.
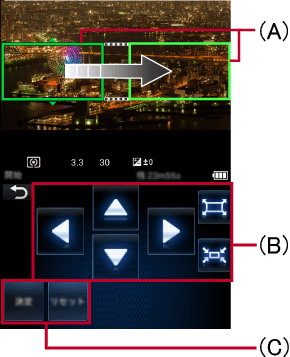
| (A)* |
Crop Start Frame (green) Crop End Frame (yellow-green) |
| (B) | Move frame position/Zoom Operation |
| (C) | Set frame position/Reset |
* The frame is yellow until its position is set.
- Set the mode dial of the digital camera to [
 ]
] - Tap
- Tap [4K Live Cropping]
- Select recording time ([20 s], [40 s]).
- Tap (B) and (C) to set the crop start frame/crop end frame or zoom control
- You can also change the frame position by dragging and moving with your finger.
- Tap [Adjust] if you wish to do over the set frame position or zoom operation.
- Start recording
- Notes
- A video will be recorded in [MP4], [MP4(LPCM)], [MOV] format.
- Only the area inside the specified frame will be recorded.
Add a marker to interesting scenes while recording
While recording in 6K/4K Burst (S/S), you can add a marker by tapping![]() .
.
You can check pictures with markers on the digital camera itself.
Taking Bracket photos
- Tap
- Tap [Bracket], then select the [Bracket Type] you want to set the digital camera to
- Select the recording method
- Taking still pictures
Taking pictures using the Touch Shutter function
Simply touch the subject you want to focus on, and it will automatically focus and release the shutter.
- Tap

- Icon will change to
 , and taking a picture with the Touch Shutter function becomes possible.
- Icon will change to
- Touch the subject you wish to focus on, and then take a picture
- The picture is taken when the focus is achieved.
- Taponce again to cancel the Touch Shutter function.
Easily optimizing the brightness for a specified area (Touch AE)
- Optimizing the focus and brightness in the position touched
When setting [Touch AF] to [AF+AE] in [Touch Settings] in the [Custom] menu on the digital camera, you can optimize the focus and brightness in the area you touch.
Touch the subject for which you would like to optimize the brightness to display the AF area frame and brightness optimization position. The brightness and focus can be optimized in the same area.
- Tap
 to cancel the setting.
 - When using Manual Focus, tap
 to optimize only the brightness.
- Optimizing only the brightness in the position touched
If the [Touch Settings] are different from those above, you can only optimize the brightness for the area that has been touched.
1. Tap
2. Touch the subject for which you would like to optimize the brightness
3. Tap [Set]
- This will optimize the brightness in the position touched.
- Tap
 to cancel the brightness optimization position.
(For iOS devices)
- Tap
 to return to the previous screen.
(For Android devices)
- Tap the return button of the device you are using to return to the previous screen.
Taking pictures with an automatic focus point (Auto Focus)
When the digital camera is set to Auto Focus, touching the screen will display the AF area frame, and the point of focus can be adjusted.
Explanation follows below.
| Item | Contents |
|---|---|
| [Face/Eye Detection] | Recognizes people's faces and eyes, adjusts focus point and exposure. |
| [Tracking] | Adjusts to the set subject and exposure. The focus point and exposure will follow even if the subject moves. |
| [225-Area] | When the subject is not the center of the screen, AF area can focus on up to 225-Areas. |
| [Custom Multi]* | Select the AF area that matches the subject from the 225 AF areas to configure the AF area's shape freely.
* When taking still pictures with [Custom Multi], the AF area set with the digital camera will be used. The AF area's settings cannot be customized from this application. Configure the settings for the digital camera in advance. When tapping your smartphone screen, it won't adjust the focus point. |
| [1-Area] | After the focus point has been selected, the AF area frame in the center of the screen will focus accordingly. |
| [Pinpoint] | When you want to focus on a point smaller than [1-Area], use the enlarged view and select a focus point. |
- Tap
 to clear the AF area frame settings.
 - Tap [Reset] to return the AF area frame to the center of the screen.
- When changing Auto Focus Mode, you can change the digital camera's settings or change settings with the icon
 * on the screen.
* When using a smartphone, tap![]() or
or![]() to display icon
to display icon![]() .
.
Setting the focus point manually after adjusting the automatic focus point (AF+MF)
If [AF+MF] is active in the digital camera custom menu, when the focus mode is set to [AFS], a Manual Focus slide bar will be displayed, allowing you to adjust the focus point manually. Tap the slide bar to switch to MF Assist and display the enlarged screen. Set the focus point and tap![]() to take a picture.
to take a picture.
- If you tap [Exit] before tapping, your settings will be discarded and you will be returned to the Auto Focus screen.
Manually selecting focus point (Manual Focus)
When the digital camera is set to Manual Focus, a sliding bar appears on the screen, and the focus point can be manually adjusted.
You can adjust the sliding bar shown below by dragging it.
(During vertical display)
- If the Touch Shutter function is active, touch the screen to take a picture.
- Tap
 to adjust the focus point within the AF area displayed on the screen. By dragging the AF area, you can adjust its position. When using MF Assist (see below), the focus point will be set to the center position of the screen.
 - Each time the following buttons are tapped, the peaking setting will switch.
When the peaking is active, in-focus portions are highlighted with color.*
| : | The detection level for in-focus portions is High. | |
|---|---|---|
| : | The detection level for in-focus portions is Low. | |
| : | In-focus portions are not highlighted. |
* Depending on the recording mode, this function may not operate.
- MF ASSIST
(Displaying the MF Assist)
- Double tap (tap twice in quick succession) or pinch out (spread apart two fingers) to switch to the MF Assist screen and display the enlarged screen.*
* This can only be performed with the Touch Shutter function disabled.
- Each time
 is tapped, the enlarged display will switch between a windowed screen display and a full screen display. You can scroll by dragging the screen.
 - By tapping
 /
/ , you can zoom in / zoom out (by 0.1×). With a long tap, you can zoom in / zoom out by 1×.
 - You can also zoom in / zoom out by pinching out (spreading two fingers) or pinching in (bringing two fingers together.)
- Tap [Reset] to return the magnified position to the center.
(Closing the MF Assist)
- Double tap the screen or tap [Exit] to close MF Assist.
Changes to digital camera operation
If the digital camera is used while using the remote function on smartphone, the smartphone remote function will be stopped, and digital camera operations will be given priority.
- During digital camera operation, [Camera operation is in progress.] is displayed, and it cannot perform smartphone operations. Specifically, when the digital camera is in Playback mode, [Camera operation is in progress.] will continue to display. If you want to resume smartphone operation, please switch the digital camera itself to recording mode.
Creating a video with [Stop Motion Animation]
Shoot a stationary object like a doll while moving it bit by bit to create a video that looks as if it is moving by connecting these images.
(If the [Priority of Remote Device] is set on the [Camera])
- Set the drive mode dial of the digital camera to [
 ]
] - Press the [MENU/SET] button on the digital camera and select [Rec] > [Time Lapse/Animation] > [Stop Motion Animation]
- Tap
(When confirming recorded images)
- You can confirm recorded images by tapping
 and going to the playback screen.
- You can confirm recorded images by tapping
- Move the subject and set the composition
- Repeat taking still pictures as before.
- Tap [Complete] to exit recording
- Select method for creating video
Set the quality, frame rate, and sequence.
- Tap [Execute]
(If [Priority of Remote Device] is set on the smartphone)
- Change recording settings to [Time Lapse/Animation] by tappingon the application recording settings screen
- The displayed icon may differ depending on the recording settings.
- Tap onand select [Stop Motion Animation]
- (If [Priority of Remote Device] is set on the camera), perform step 3 onwards
- Notes
- Pictures recorded in [Stop Motion Animation] will be displayed together in a single Picture group. If only a single image is recorded, it will not be recorded as a Picture group.
- If you set [Double Slot Function] to [Relay Rec] and record pictures to more than one card, the resulting pictures will be recorded into separate groups. In this case, a continuous motion picture cannot be created.
- Created videos will be saved in MP4 recording format.
- In some cases, [Stop Motion Animation] cannot be used depending on the recording mode.
Taking pictures mid-jump
When you hold your smartphone or put it into your pocket, the camera's shutter can be released automatically as the smartphone detects the peak of the jump. This operation is useful for taking a still picture while a subject jumps.
Preparation
- Please attach your digital camera to a tripod or similar.
- We recommend to take a test picture and adjust the digital camera's angle and jump height.
Operation
- Tap [Jump Snap]

- Select the sensitivity
- Jump while holding your smartphone
- A picture will be taken when the jump is detected.
- Your smartphone will display
 during Jump Snap mode.
 - You can select a Jump Snap sensitivity ranging from [1] to [5].
The number indicates the sensitivity level. At a high setting your camera's shutter may close even if you jump slightly. - After you have finished taking the Jump Snap, please select [OFF].
- Notes
- Under the following conditions it may happen that the digital camera's shutter will close too slow and not take a picture with the intended timing.
- Recording in crowded places / places with weak signal
- Recording scenes with flash
- Recording settings besides single picture like AF Mode / Burst / Self Timer / Bracket Recording are used
- To ensure that you do not drop your smartphone during the jump, please make sure to fasten all buttons and zippers and remove your gloves.
- For Jump Snaps the sensors in your smartphone will detect the jump and take a picture, but there might be occasions where using this operation is not possible.