Operate the shutter button with a smartphone (Shutter Remote Control)*
The shutter button can be operated with a smartphone via a Bluetooth connection to the camera.
* This function cannot be used on the DC-GH5 (Firmware Version 1.0 - 1.1).
Please update to firmware version 2.0 or higher.
Preparation
- Make a Bluetooth connection to the camera
Operation
- Tap
 >
> 
- Follow the instructions on the screen.
| : | Taking a still picture When Burst mode has been set, pictures can be taken in quick succession by sliding |
|
| |
: | Recording a video Video recording is started. Tap again to stop recording video. |
Turning on/off the camera with a smartphone
Even when the camera is turned off, it can be woken up and operated remotely.
Preparation
- Make a Bluetooth connection to the camera
- Set the camera's [Remote Wakeup] to [ON]
- See digital camera operating instructions for details.
- Set the camera on/off switch to [OFF]
Operation
- Tap > [Remote operation]
- The camera automatically turns on, allowing it to make a Wi-Fi connection automatically.
Backing up images to a Cloud Storage automatically (Auto Cloud Backup)
When the smartphone connects to the set wireless access point, the camera's images are automatically backed up to the preset cloud storage.
Preparation
- Set a wireless access point on the camera in advance*
- Please set the wireless access point with the camera in advance.
- Access the “LUMIX CLUB” site using a smartphone or computer and set*
http://lumixclub.panasonic.net/eng/c/
- You need to log in with your ID. If you do not have an ID, follow the instructions on the screen.
- Select and register the cloud storage service you want to use in “Cloud Storage Link Settings” in “Web service link settings”.
* See digital camera operating instructions for details.
Operation
- Make a Bluetooth connection to the camera
- Choose the camera to be set from [Camera registered]
- The settings screen is displayed.
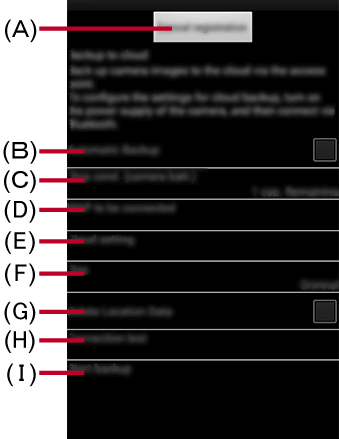
(A) [Cancel registration] - Delete registered camera information.
(B) [Automatic Backup] - Enable [Automatic Backup].
(C) [Stop cond. (camera batt.)] - Backup may be interrupted depending on battery remaining.
– [1 cap. Remaining] / [2 cap. Remaining]
(D) [WAP to be connected] - Set wireless access point to be used for backup. Please set the wireless access point with the camera in advance.
(E) [Cloud setting] - Configure backup destination.
(F) [Size] - Set the size of images to be backed up.
(G) [Delete Location Data] - Delete stored location data.
(H) [Connection test] (I) [Start backup]
- The settings screen is displayed.
- Activate [Automatic Backup] (B)
- Tap on [WAP to be connected] (D) and select a wireless access point set on the camera
- Tap on [Cloud setting] (E) to configure cloud settings
- Follow setting instructions on screen.
- Running a backup
If you set the [Remote Wakeup] of the camera connected by Bluetooth to [ON], if the smartphone connects to a wireless access point when the camera is turned off, it automatically backs up images on the camera.
Transferring recorded images to a smartphone automatically
When [Auto Transfer] is set to [ON], with the camera connected by Bluetooth, images will be automatically transferred to the smartphone, and added to [Camera Roll] (iOS), or [Gallery] (Android) every time you shoot.
Preparation
- Make a Bluetooth connection to the camera
- Set the camera's [Auto Transfer] to [ON]
- See digital camera operating instructions for details.
- On the smartphone, select [Wi-Fi Settings] (iOS devices), or [YES] (Android devices)
- Check the send settings on the camera, and select [Set]
Operation
- Start “Image App”
- Take pictures on the camera
- Every time you take a picture, it will be automatically saved to [Camera Roll] (iOS), or [Gallery] (Android).
- Notes
- When [
 ] appears translucent on the camera recording screen, images cannot be transferred automatically.
Please check the connection status of the Wi-Fi with the camera. - When [Auto Transfer] in the [Bluetooth] is set to [ON], [Wi-Fi Function] is disabled.
Recording location information to the camera’s images*
* This function is not available on smartphones not equipped with GPS (location information acquiring function).
Preparation
- Make a Bluetooth connection to the camera
- Set the camera's [Location Logging] to [ON]
- See digital camera operating instructions for details.
Operation
- Take pictures on the camera
- Location information will be written to the recorded pictures.
- Notes
- Images with location information added using the location information acquiring function may contain personal information such as location information which could be used to identify you. Be aware of these issues when you upload images to a website.
- When taking still pictures in certain locations such as indoors, accurate GPS location information may not be available, and location information may not be saved.
Synchronizing the camera’s clock with a smartphone
When [Auto Clock Set] is set to [ON] with the camera connected by Bluetooth, you can synchronize the camera's time and time zone with the smartphone if you connect to your camera.
Preparation
- Make a Bluetooth connection to the camera
- Set the camera's [Auto Clock Set] to [ON]
- See digital camera operating instructions for details.
Saving the camera’s setup information to a smartphone
Save the camera settings onto smartphone and use the same settings on multiple cameras by loading it onto the camera.
Preparation
- Make a Bluetooth connection to the camera
Operation
- Tap >

- Explanation follows below.
Item Contents [Save setting] Save setting information of the connected camera onto smartphone. [Saved camera settings] Setting information corresponding to the connected camera will be displayed. The following menu will be displayed when you tap on setting information.
[Send to camera]
Setting information will be loaded onto the camera.
[Changing the name]
You can change the name of the setting information. The name of the setting information saved by default is shown below.
– Camera name/date saved/Y/M/H/min
(Maximum number of characters: 30)
[Delete]
Delete information.
- Explanation follows below.
- Tap [Save setting]
- Camera setting information will be saved on the smartphone.
- Up to 10 items can be saved.
- Load setting information with camera
Tap on the settings you want to load from [Saved camera settings], and select [Send to Camera].