You can share files stored in a PC with a VIERA TV via a home network.
- Playback function
-
By using “File Sharing Eor “DLNA Efunction of VIERA TV, you can easily play photo, video and music files stored in your PC on player of the VIERA TV.
“File Sharing Efunction enables sharing the files between PC and devices connected to VIERA TV.
“DLNA Efunction enables sharing the files between the network equipment (DLNA Certified VIERA, PC, etc..) and devices connected to VIERA TV.
- Copy function
-
You can easily copy photo, video and music files stored in your PC to USB devices or SD Card connected to the VIERA TV by operating your PC.
And you can play copied files on player of the VIERA TV.
- *1 Depending on the VIERA’s model, these functions are not supported.
- *2 For how to connect the VIERA TV to the home network, see the operating instructions of VIERA TV.
- *3 For information about wireless LAN router and USB HDD, see Wireless LAN Information of VIERA / USB-HDD Information of VIERA.
PC Preparations (Ex. Windows 8.1)
Configuration of the PC described as below is necessary before using Playback function.
Make sure that the PC is connected to the home network.
For information about network connection and setting for the PC, see the operating instructions of the PC.
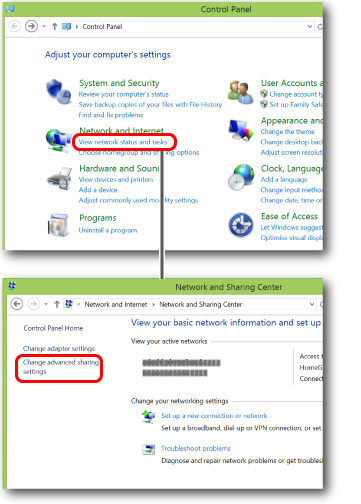
Open the Control Panel and click [View network status and tasks] - [Change advanced sharing settings].
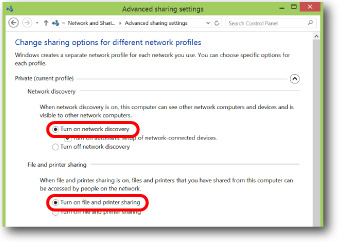
Select [Turn on network discovery] for [Network discovery],
and select [Turn on file and printer sharing] for [File and printer sharing].
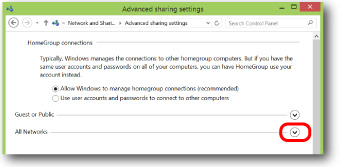
Click [V] for [All Networks] and display setting items.
Depending on the PC and network environment, [All Networks] may not be displayed. In this case, skip to the next step.
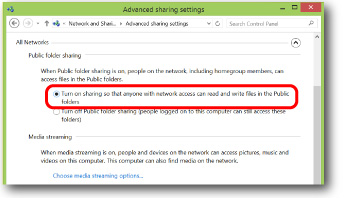
Select [Turn on sharing so that anyone with network access.......] for [Public folder sharing].
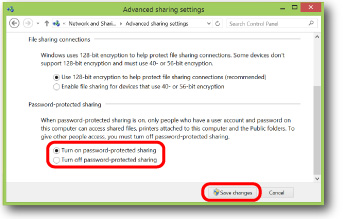
Select any of the alternatives for [Password-protected sharing] and click [Save changes].
When you select [Turn on password-protected sharing], you need to enter the user name and password for the Windows PC to access the PC from the VIERA TV.
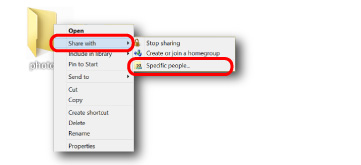
Right-click the folder you want to access from the VIERA TV and select [Share with] - [Specific people...].
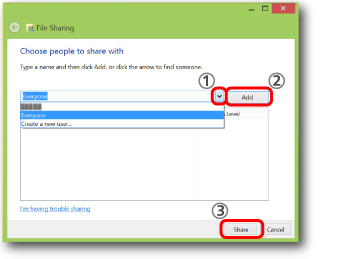
Click [V] to display the list. Select [Everyone], and then click [Add] and [Share].
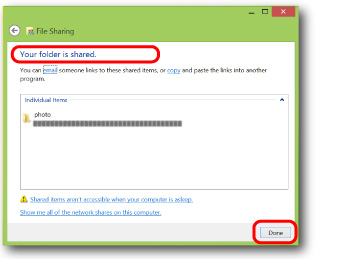
Confirm that "Your folder is shared." is shown and click [Done].
Set the folder you want to access from the VIERA TV.
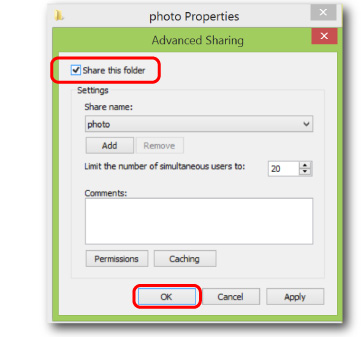
- Open Properties and click [Sharing] - [Advanced Sharing].
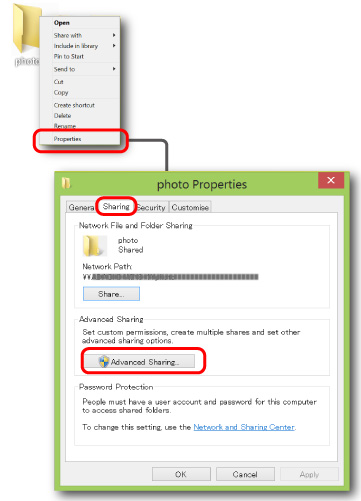
- Check the box for "Share this folder" and click [OK].
-
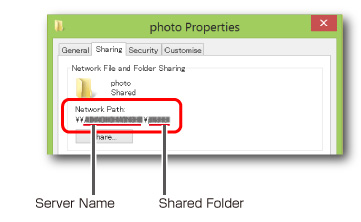
Confirm the Server Name and Shared Folder.
(When you set up on the VIERA TV, entering these names is required.)Available characters for the VIERA TV setting are shown below.
Use these characters for the Server Name and Shared Folder. Note the IP address cannot be used for the Server Name.- Server Name (up to 15 characters):
- [A-Z][0-9]!#$%[a-z]&(){}-._
- Shared Folder (up to 128 characters):
- [A-Z][0-9]!:#[a-z]()+-.*_ space
- If unavailable characters are used, change them.
VIERA TV Preparations
Configuration of the VIERA TV described as below is necessary before using Playback function.
Connect the VIERA TV to the router (wireless LAN access point) via LAN cable or wireless LAN, and make the network setting of the VIERA TV.
For more information about network connection and setting, see the operating instructions of VIERA TV.
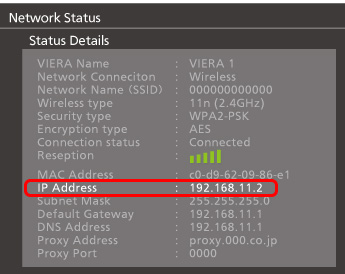
Verify that one part of the IP address of the VIERA TV and the PC are the same (connected to the same home network).
(Network > Network Status)
PC (Example)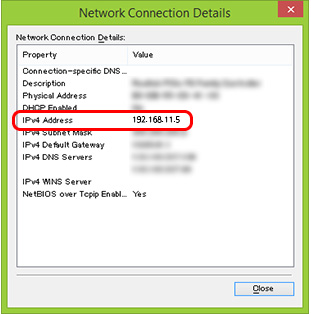
Register the PC as a network device on the setting screen of the VIERA TV.
(Network > File Sharing Settings > Network Device List)
- Select [Register New Device].
-
Enter the Server Name and Shared Folder that have been confirmed in step 10 (PC Preparations), and the user name and password for the Windows PC, and then select [Register].
If you register with the user name and password in blank, you will need to enter them each time you access the folder from the VIERA TV.
If you select [Turn off password-protected sharing] in step 6 (PC Preparations), enter "guest" as a user name and register with the password in blank.
VIERA TV (Example)
Playback on VIERA TV
After the setting are completed, start the device selection screen on the VIERA TV.
Select the icon of the Shared Folder you have registered, and enjoy playback of the content in the shared folder of the PC.
VIERA TV (Example 1)
Media Player
VIERA TV (Example 2)
Devices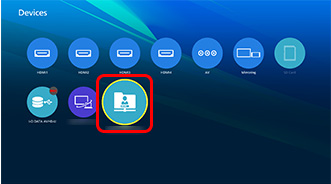
For more information about operations of Media Player, see the operating instructions of VIERA TV.
PC Preparations (Ex. Windows 8.1)
Configuration of the PC described as below is necessary before using Playback function.
Make sure that the PC is connected to the home network.
For information about network connection and setting for the PC, see the operating instructions of the PC.
Open the Control Panel and click [View network status and tasks] - [Change advanced sharing settings].

Click [Choose Media Streaming options].
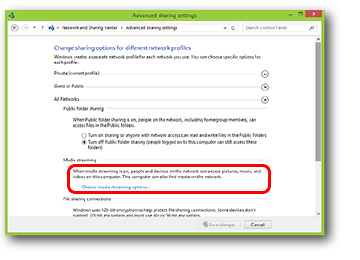
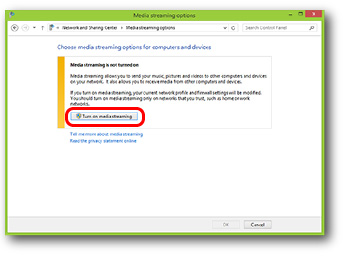
Click [Turn on media streaming].
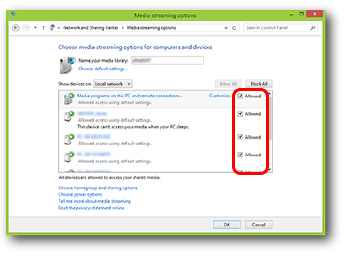
Select the devices that you want to allow media streaming.
VIERA TV Preparations
Connect the VIERA TV to the router (wireless LAN access point) via LAN cable or wireless LAN, and make the network setting of the VIERA TV.
For more information about network connection and setting, see the operating instructions of VIERA TV.
Verify that one part of the IP address of the VIERA TV and the PC are the same (connected to the same home network).
(Network > Network Status)
PC (Example)
Playback on VIERA TV
After the setting are completed, start the device selection screen on the VIERA TV.
Select the PC you have configured as DLNA server, and enjoy playback of the content in the shared folder of the PC.
VIERA TV (Example 1)
Media Player
VIERA TV (Example 2)
Devices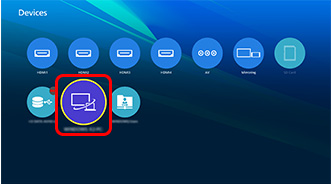
For more information about operation of player, see the operating instructions of VIERA TV.
VIERA TV Preparations
Configuration of the VIERA TV described as below is necessary before using Copy function.
Connect the USB device or SD Card to the VIERA TV.
For more information about the connection, see the operating instructions of VIERA TV.
Connect the VIERA TV to the router (wireless LAN access point) via LAN cable or wireless LAN, and make the network setting of the VIERA TV.
For more information about network connection and setting, see the operating instructions of VIERA TV.
Verify that one part of the IP address of the VIERA TV and the PC are the same (connected to the same home network).
(Network > Network Status)
PC (Example)
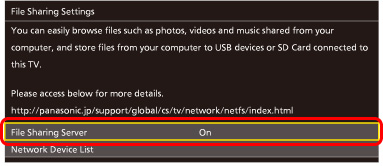
Make sure that "File Sharing Server" on the VIERA TV is set to "On".
(Network > File Sharing Settings > File Sharing Server)
Observe the VIERA name on the network.
(Network > Network Status)
You can change the VIERA name.
(Network > VIERA Name)
When more than one VIERA TV is connected to your home network, set a different name for each so that they can be recognized correctly.

How to operate PC for Windows (Ex. Windows 8.1)
For information about network connection and setting for the PC, see the operating instructions of the PC.
Open Windows Explorer and type "\\VIERA Name" into the address bar, then press Enter.
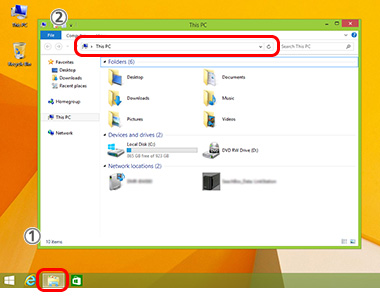
For how to check the "VIERA Name", see VIERA TV Preparations.
The IP address of the VIERA TV can be input instead of the "VIERA Name".
Access to the VIERA TV is also possible under [Network] in Windows Explorer by selecting the target VIERA TV if it is displayed in the place of Computer.
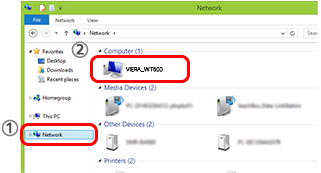
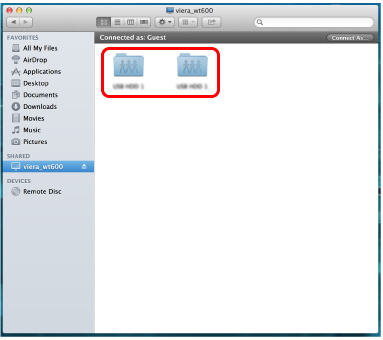
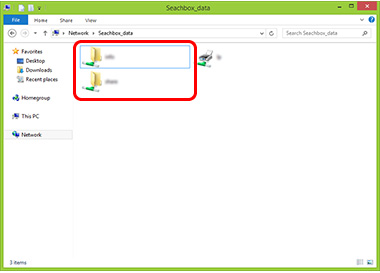
A folder icon for USB devices or SD Card on the VIERA TV will appear.
Select the target folder and copy files, such as photos and videos, from your PC.
How to operate PC for Mac OS (Ex. Mac OS X 10.8)
For information about network connection and setting for the PC, see the operating instructions of the PC.
Select [Go] - [Connect to Server].
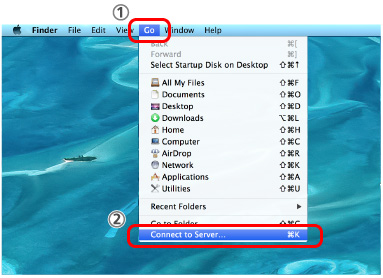
Type "smb://VIERA Name" into [Server Address] and click [Connect].
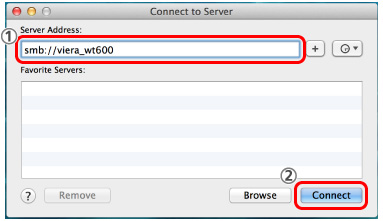
For how to check the "VIERA Name", see VIERA TV Preparations.
The IP address of the VIERA TV can be input instead of the "VIERA Name".
You can store the typed server address in [Favorite Servers] by clicking [+].
Select [Guest] and click [Connect].
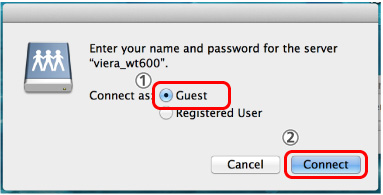
A folder icon for USB devices or SD Card on the VIERA TV will appear.
Select the target folder and copy files, such as photos and videos, from your PC.
