
![]() Digital AV Support > Digital Camera > Download > LUMIX Repair Tool
Digital AV Support > Digital Camera > Download > LUMIX Repair Tool
Text begins from here.
LUMIX Repair Tool
DGDSC32
LUMIX Repair Tool function
When recording a video, this tool makes it possible to repair a video file that has not been saved correctly for any reason.
Notes
- It may not be possible to repair the file depending on the damage.
- After repair, the movie file cannot be played back using the camera.
- The EXIF information, such as the recording time, of the original file is lost.
Repairable video recording formats and files
The files in the following formats with the ".mdt" extension can be repaired.
- MOV (audio: LPCM)
- MP4 (audio: LPCM)
* Videos in MP4 (audio: AAC) or AVCHD format cannot be repaired.* Files in the formats above with an extension other than ".mdt" cannot be repaired.
Operating environment
Compatible OS : Windows 10( 1903 or later )
Download Program
| Downloaded File Name | LUMIX Repair Tool V2_3.zip |
| File Size | 2,140,152 bytes (After Extraction: 4,268,544 bytes) |
| Date Updated | Jun. 24, 2025 |
Software License Agreement & Download
To use this software,you must agree to the content of the Software License Agreement.
If you do not agree to the license agreement, you can not proceed the software download.
Preparation of the repair operation
Prepare the following two files 1. and 2. in advance.
- The file you want to repair (with the ".mdt" extension). This file is called "file for repair" below.
- A file that has been saved correctly (.mov or .mp4)
* The file must be in the same recording (MOV/MP4) and audio (LPCM) formats as the file for repair, must have the same recording quality, and must be a video file of approximately 1 second in length..
- Please secure free space on the computer's hard disk, it requires the capacity for triple size against the repair file.
Procedure using the LUMIX Repair Tool
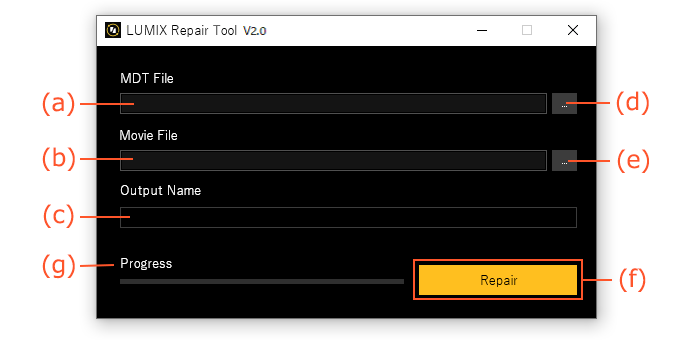
Figure 1 Displayed screen
- Double-click on "LUMIX Repair Tool V2_2.exe" inside the folder where LUMIX Repair Tool is saved.
* The screen shown in Figure 1 is displayed.
- Drag and drop the file for repair (.mdt) to (a) shown in Figure 1.
You may also click the browse "…" button ((d) in Figure 1) and then select the file for repair on the file selection screen that appears. - Drag and drop the file that has been saved correctly (.mov or .mp4) to (b) shown in Figure 1.
You may also click the browse "…" button ((e) in Figure 1) and then select the file on the file selection screen that appears. - The file name that has been allocated automatically is displayed under output file name ((c) in Figure 1).
Enter a name of your choosing if you want to change the name of the repaired file. - Click the "Repair" button ((f) in Figure 1) to start the repair process.
* The color of the "Repair" button changes after the files have been selected.
- During the repair process, the progress is shown in the progress bar ((g) in Figure 1).
- A completion message is displayed when the repair process is complete.
* The repaired file is output (saved) in the same folder as the file for repair.
- If you want to repair other files, repeat the steps 2. to 7.
If you have finished repairing files, click the "x" button to close the repair tool.