
Create Storyboard
[1. Set music]
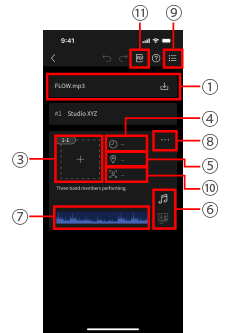
1Select music
Synchronize the recording with music by selecting music to use in the work.
Import the video and music to the timeline in a synchronized state during editing.
Select from the music saved to the smartphone.
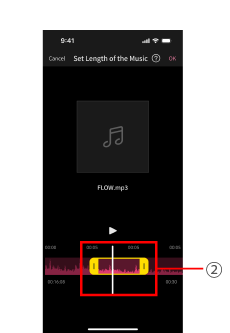
2Extract the range of music to be used
The range to be used in the work can be specified in the selected music.
[2. Create a storyboard]
3Switch to drawing screen
On the drawing screen, you can insert images or create simple drawings.
4Time per shot
Enter the time if you wish to allocate time to each shot.
The total length is also shown.
5Location
Enter the location. By selecting a location when it is time to record, you can restrict display to the shots to record at that location.
6Lip-sync scenes/B-roll scenes
You can specify individual shots as a lip-sync scenes (with acting) or secondary, B-roll scenes.
Timelines are automatically created as separate sequences, which makes them easier to manage in editing software.
7Set the recording range for each shot
The recording range can be set for each shot.
8Display the Edit menu
Scene and shot additions, etc. can be performed from the Edit menu.
9Switch to drawing screen
[3. Create a shot list]
10Group Shots
Shots with the same angle can be grouped together by setting the shot group name.
Shots and shot groups can be used as a shot list during recording.
[4. Share with staffers and performers]
11Export to PDF
You can export the storyboard as a PDF file.