Geotagging (Adding location information from smartphone onto digital camera images*)
* This function is not available on smartphones not equipped with GPS (location information acquiring function).
Preparation
- Wi-Fi connection
- Activate location information option on smartphone
Operation
- Tap

- Tap [Geotagging]

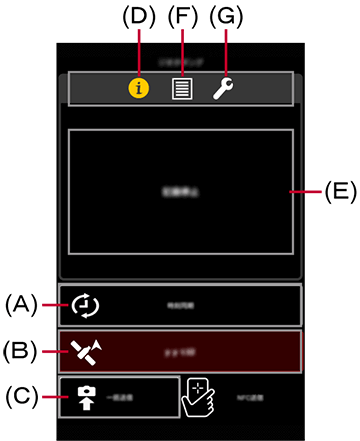
(A) Time synchronization (B) Recording start/stop (C) Send location data (D) Display operational condition (E) Operational condition display area (F) Operation log (G) Recording interval - Tap (A) to adjust current time on digital camera
-
Tap (B) to start recording location information
- Tap again to stop recording.
- Please stop recording location information when not using it as it consumes battery quickly while active.
If you want to stop Geotagging, tap (B) and stop recording location data.
- Taking still pictures
- Depending on the model, you may be unable to take pictures with your digital camera while connected to Wi-Fi.
In that case, please disconnect your Wi-Fi before taking pictures. You can connect again once you are finished.
- Depending on the model, you may be unable to take pictures with your digital camera while connected to Wi-Fi.
- Tap [Batch transfer]
- You can batch send location data obtained for pictures you have taken with your digital camera.
- Once you finish sending the location data, the message [Location data sent. Erase location data?] will be displayed.
Select either [Erase] or [Cancel].
After your location data has been sent, the message [Save the current location information to the picture file?] will be displayed. Tap [Write] and start saving the location data.
Depending on the model, manual operation of the device may be required to save location information.
Please also see digital camera operating instructions.
Send over NFC* (Send location data individually)
You can use the NFC function to write location data obtained with your smartphone to a picture that is being played back.
- Play back the picture to which you want to write your location data on the digital camera and touch the
 part of the digital camera with your smartphone.
Your location data will then be written and displayed for the picture being played back.
* Compatible models |
: | DMC-GX8 / TZ70 / TZ71 / ZS50 |
|---|
- Displaying operational condition / log
- Tap (D), operational condition will be displayed in the (E) area.
Tap (F) to display location information recording logs. Max. log storage capacity is 20 entries. New entries exceeding max. amount will overwrite previous data.
- Setting recording interval
- Tap (G) to select location information recording interval.
1, 5, 15, 30, 60 sec. intervals are available.
- Notes
- After recording begins, location data will continue to be recorded according to the set recording interval.
During that time, If you film with the digital camera while switching multiple SD cards*, please repeat the following steps for each SD card.
(a) Switch the SD Memory Card in the digital camera.
(b) After confirming the connection between the digital camera and smartphone has not been disconnected, repeat steps 5 - 6.
* SD / SDHC / SDXC Memory Cards are indicated as “SD Memory Cards” in this text.
- Images with location information added using the location information acquiring function may contain personal information such as location information which could be used to identify you. Be aware of these issues when you upload images to a website.
- When taking still pictures in certain locations such as indoors, accurate GPS location information may not be available, and location information may not be saved.
- Max. location data storage capacity is 600,000 entries. *New entries exceeding max. amount will overwrite older data.
* Approx recording period is 1 month when recording interval is set at a 5-sec.
- For using sent location data, see digital camera operating instructions.
Join Snap Movies
You can join up short videos you recorded in your digital camera's Snap Movie Mode and add music.
| * | Compatible models | : | DC-GF10 / TZ90 / TZ91 / TZ92 / TZ93 / ZS70 / FZ80 / FZ82 / GF9 / GX800 / GX850, DMC-FZ2000 / FZ2500 / LX9 / LX10 / LX15 / G80 / G81 / G85 / GX80 / GX85 / GF8 / TZ100 / TZ101 / TZ110 / ZS100 / ZS110 / TZ80 / TZ81 / ZS60 / FZ300 / FZ330 / GX8 / G7 / G70 / GF7 / GM5 / GM1S |
|---|---|---|---|
| Compatible device | : | Android devices 4.3 or later (Some devices may not be compatible.) | |
| iOS devices 7.0 or later (Some devices may not be compatible.) |
Preparation
- Wi-Fi connection
Operation
- Tap
- Tap [Snap Movie]

A send message will be displayed on the screen.
Tap one of the following.[YES] : Send Automatically
→ Go to step 4
(For more details, see Note.)
[NO] : Send Manually
→ Go to step 3 - Select the Snap Movies to join
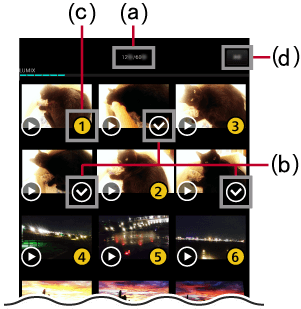
(a) Total Time / Max. Time (b) Unselected Icon (c) Selected Icon (d) Begin Sending - Tapping (b) adds the total time to (a). You can select up to a maximum of 60 seconds.
In doing so, numbers will be attached to the thumbnails in the order you tapped them.
Those numbers will also be the playback order in Step 4 on the preview screen.
Once you have finished selecting, tap (d).
This will begin sending the movie to a smartphone.
- Tapping (b) adds the total time to (a). You can select up to a maximum of 60 seconds.
- Join
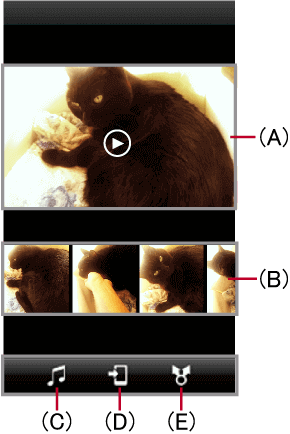
(A) Preview (B) Swap (Del.) Scenes (C) Add BGM (D) Save (E) SNS - You can drag and drop thumbnails to the left and right with (B) to swap out scenes. You can check the editing results for Snap Movies that have had scenes swapped out with (B) or BGM added with (C) by tapping (A).
If you want to delete a scene, drag the thumbnail to the top part of the screen while holding it.
 will appear and you will be able to delete it.
If there is a Snap Movie you can add to, scrolling the thumbnails to the right will display .
.
- You can drag and drop thumbnails to the left and right with (B) to swap out scenes. You can check the editing results for Snap Movies that have had scenes swapped out with (B) or BGM added with (C) by tapping (A).
- Save; Upload to a SNS*
* A LUMIX CLUB login ID is required to send to a SNS when using an iOS device.
- Tap (D) to save the Snap Movie you have joined to your smartphone.
Tap (E) if you want to share it on a SNS.
- Tap (D) to save the Snap Movie you have joined to your smartphone.
- Note
<About Send Automatically>
| e.g. | : | If you recorded Snap Movies on 8/12 |
|---|
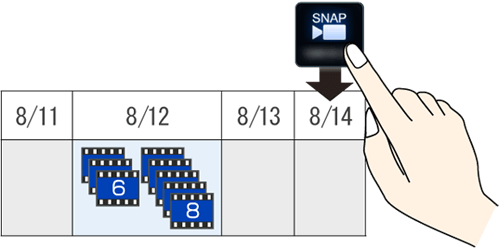
The Snap Movies that will be sent are ones that were recorded up to 3 days before the activation of![]() .
.
In the above example, Snap Movies that were recorded on 8/12 will be sent.
If you have also recorded after 8/12, only the Snap Movies with the date closest to the day![]() is activated will be sent.
is activated will be sent.
Edit still pictures on Photo Collage function
Take your favorite still pictures and combine them together on one image on your own.
Preparation
- Wi-Fi connection
Operation
- Tap
- Tap [Photo Collage]

- Pick a frame
The frame selection screen is displayed.
- Tap the frame you want to use.
The number of still pictures you can use will vary depending upon the frame.
- Tap the frame you want to use.
- Choose a still picture*
The still picture thumbnails are displayed.
- Please put a check mark in the thumbnails of the still pictures you want to insert into the frame.
* If the digital camera is not connected, the thumbnails of still pictures saved in [Camera Roll] (For iOS devices) or [Gallery] (For Android devices) will be displayed.
- Tap [Execute]
It will begin to insert the still pictures into the selected frame.
- If you want to change the photo frame, please tap
 .
. - If you want to change the still pictures, please tap the smartphone's back button, and please reselect still pictures from step 4.
- If you want to change the photo frame, please tap
- Tap
 and save the edited image
The message [The pictures have been saved.] will be displayed.
- To conclude editing in photo frame, tap [Exit].
- Notes
- Images that have been edited once cannot be re-edited later.
- If a video is selected, the image being displayed as the thumbnail can be used.